Do you knit or crochet? Do you have trouble keeping track of your needles, hooks and yarn? If so, we've found some great organizational ideas to help you out.
On www.planetjune.com we found this really cute Roll-Up case for storing your crochet hooks. She has step by step instructions with photos. How cute this would be made from your favorite fabrics.
Here's another similar item made to store your knitting needles from multicrafty.blogspot.com Oh... how handy it would be to have them all in one place.
We also found this one that's made similar to the others. It's from www.turkeycookies.blogspot.com. So cute and nice with the different sized pockets.
And check this out... what a great idea for organizing yarn. There's instructions with photos on how to make it. www.leethal.net. It's a work of art in itself.
Need an easy way to keep your yarn clean and organized while working on a project? Check out this upcycled oatmeal box yarn holder from A Bit of Sunshine.
All of these are such great ideas. Do you have an tip or secret to keeping your crochet/knittng supplies organized? We'd love to hear from you. Be sure to let us know by leaving a comment.
Have a great week!
Deena Davis
www.byyourhands.com
Monday, May 17, 2010
Sunday, May 16, 2010
Blog Party Sunday, Show us your Etsy or Artfire shop
Today's Blog Party is going to be different. We are inviting you to share your Etsy or Artfire shop with everyone and include a photo of your favorite item in your shop.
My favorites change all the time but right now I love this Lost Sock Basket I made recently. It is in my Handmade By Bette Etsy shop
Show Us Yours:
So, now it’s YOUR turn for the party this week! What is your favorite thing you have in your Etsy or Artfire shop that you would like to share with us.
Our guidelines have changed this week:
1. Just click on the Add Your Link button below, and add your Etsy or Artfire url to your shop for the link.
2. Add a picture of your item.
3. If you are a blogger, please add our button to your blog and invite your readers back to join the party.

My favorites change all the time but right now I love this Lost Sock Basket I made recently. It is in my Handmade By Bette Etsy shop
Show Us Yours:
So, now it’s YOUR turn for the party this week! What is your favorite thing you have in your Etsy or Artfire shop that you would like to share with us.
Our guidelines have changed this week:
1. Just click on the Add Your Link button below, and add your Etsy or Artfire url to your shop for the link.
2. Add a picture of your item.
3. If you are a blogger, please add our button to your blog and invite your readers back to join the party.
Friday, May 14, 2010
Trash to Treasure ---- Office Chair
I have had this chair for many years. It is well made and still in great shape, clean but stained. As you can see the upholstery fabric probably dates back to the 60's with it's orange and brown stripes.
I use it as my sewing chair and decided to update it with chenille slip covers.
I will share with you how I made the covers but I don't have specific patterns as this can be done for any size chair fitting the covers right to the chair.
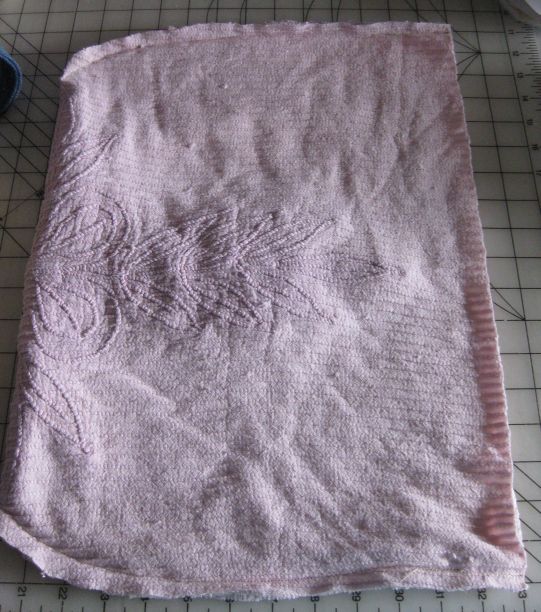
My vintage chenille spread had a design I wanted to incorporate into it so I roughly cut a large enough rectangle of fabric to fold over the seat back.
With the right side of the fabric against the back of the chair, I pinned the sides of the chenille together leaving about 1/2 inch of room between the chair and the pins. Pin from the curve of the top, around the sides and continue straight down at the bottom, not following the bottom curve of the chair or you won't be able to get the cover off and on the chair back.
Following my pinned seams, I sewed both sides of the cover.
I measured the chair back from top to bottom and then added 1 3/4 inches. This is the measurement I used to figure the length of the cover.
Laying the cover on my table I marked my measurement on the slip cover and cut the bottom evenly across.
I resewed the seam allowance and turned it right side out.
For the ruffle on the bottom of the cover I cut two 30 inch lengths of co-ordinating fabric 4 1/2 inches wide. I didn't want a very full ruffle here so only added 20 inches to the diameter measurement of the bottom of the cover.
I sewed the side seams in a 1/4 inch seam and made a small hem on the bottom edge.
I sewed double gathering lines around the top edge of the ruffle, the first one 1/4 inch from the edge and the second gathering line 1/8 inch away from the first.
Pulling both threads together I slightly gathered the ruffle to match up to the bottom of the cover and pinned them right sides together.
I sewed them together following the second line of stitching.
Turn right side out and put it on the chair back.
For the seat cover I laid the chenille on the seat exactly where I wanted the pattern of the chenille to sit and very carefully cut around the chenille using the bottom edge of the seat as my cutting line.
Because this is vintage chenille and I will be sitting on it I decided to add a layer of batting and a lining fabric. I used a quilted muslin for the lining to add more body to it.
Using the chenille as a pattern, I cut the batting and lining to match. I pinned all three layers together with the chenille and lining right sides out and the batting in between. I tacked all three layers together on my machine at equal distances apart. If you don't have a stationary tacking stitch on your machine, you could use a zig zag stitch which is what I did. The fabric layers are so thick they didn't move as I sewed several times in one spot. You could also tack them together by hand.
Then I zig zag stitched the layers together all around the outside edge.
For the ruffle I cut four strips of fabric, 7 inches wide x 36 inches long.
I sewed the sides seams together, leaving one seam open because the ruffle will have to be left open at the back to fit around the metal piece that holds the seat and back together.
I hemmed the sides and bottom of the ruffle and then sewed the gathering lines across the top the same as the seat back ruffle only this time because of the length of the ruffle, I broke the gathering lines up into four parts to make it easier to gather the fabric without breaking the gathering threads as I pulled on them. There is nothing more frustrating than to have your thread break when you are gathering a large expanse of fabric up so I always break up large areas of gathering thread.
Ties: I would have preferred wider ties but I only had a limited amount of the co-ordinating fabric. These are my measurements but you can change them if desired.
Cut two pieces of fabric, 2 1/2 inches wide by 21 inches long. Fold in half and stitch across the bottom and down the sides in a 1/4 inch seam, leaving the last end open for turning.
Turn right side out and press. Pin them to the center of the back seat cover, leaving one inch in between the ties. Stitch across the ends of the ties to secure them.
With right sides together, and starting at the middle of the back of the seat cover, gather the ruffle to fit the cover. Sew the ruffle to the cover.
This was a very easy project and I am very happy with how it turned out.
I use it as my sewing chair and decided to update it with chenille slip covers.
I will share with you how I made the covers but I don't have specific patterns as this can be done for any size chair fitting the covers right to the chair.
My vintage chenille spread had a design I wanted to incorporate into it so I roughly cut a large enough rectangle of fabric to fold over the seat back.
With the right side of the fabric against the back of the chair, I pinned the sides of the chenille together leaving about 1/2 inch of room between the chair and the pins. Pin from the curve of the top, around the sides and continue straight down at the bottom, not following the bottom curve of the chair or you won't be able to get the cover off and on the chair back.
Following my pinned seams, I sewed both sides of the cover.
I measured the chair back from top to bottom and then added 1 3/4 inches. This is the measurement I used to figure the length of the cover.
Laying the cover on my table I marked my measurement on the slip cover and cut the bottom evenly across.
I resewed the seam allowance and turned it right side out.
For the ruffle on the bottom of the cover I cut two 30 inch lengths of co-ordinating fabric 4 1/2 inches wide. I didn't want a very full ruffle here so only added 20 inches to the diameter measurement of the bottom of the cover.
I sewed the side seams in a 1/4 inch seam and made a small hem on the bottom edge.
I sewed double gathering lines around the top edge of the ruffle, the first one 1/4 inch from the edge and the second gathering line 1/8 inch away from the first.
Pulling both threads together I slightly gathered the ruffle to match up to the bottom of the cover and pinned them right sides together.
I sewed them together following the second line of stitching.
Turn right side out and put it on the chair back.
For the seat cover I laid the chenille on the seat exactly where I wanted the pattern of the chenille to sit and very carefully cut around the chenille using the bottom edge of the seat as my cutting line.
Because this is vintage chenille and I will be sitting on it I decided to add a layer of batting and a lining fabric. I used a quilted muslin for the lining to add more body to it.
Using the chenille as a pattern, I cut the batting and lining to match. I pinned all three layers together with the chenille and lining right sides out and the batting in between. I tacked all three layers together on my machine at equal distances apart. If you don't have a stationary tacking stitch on your machine, you could use a zig zag stitch which is what I did. The fabric layers are so thick they didn't move as I sewed several times in one spot. You could also tack them together by hand.
Then I zig zag stitched the layers together all around the outside edge.
For the ruffle I cut four strips of fabric, 7 inches wide x 36 inches long.
I sewed the sides seams together, leaving one seam open because the ruffle will have to be left open at the back to fit around the metal piece that holds the seat and back together.
I hemmed the sides and bottom of the ruffle and then sewed the gathering lines across the top the same as the seat back ruffle only this time because of the length of the ruffle, I broke the gathering lines up into four parts to make it easier to gather the fabric without breaking the gathering threads as I pulled on them. There is nothing more frustrating than to have your thread break when you are gathering a large expanse of fabric up so I always break up large areas of gathering thread.
Ties: I would have preferred wider ties but I only had a limited amount of the co-ordinating fabric. These are my measurements but you can change them if desired.
Cut two pieces of fabric, 2 1/2 inches wide by 21 inches long. Fold in half and stitch across the bottom and down the sides in a 1/4 inch seam, leaving the last end open for turning.
Turn right side out and press. Pin them to the center of the back seat cover, leaving one inch in between the ties. Stitch across the ends of the ties to secure them.
With right sides together, and starting at the middle of the back of the seat cover, gather the ruffle to fit the cover. Sew the ruffle to the cover.
This was a very easy project and I am very happy with how it turned out.
Labels:
makeover,
office chair,
sewing room,
trash,
trash to treasure,
vintage chenille
Thursday, May 13, 2010
Submissions...
We here, at By Your Hands are looking for submissions that pertain to handmade.
Please, contact us if you would like to do a tutorial, show a trash to treasure makeover, be a featured artist, or would like to show where you work. We are looking for pictures of craftrooms and work spaces, organizational tips and more.
At the present time we are giving a free one month button ad for guest posters of a tutorial, trash to treasure, organization or workspace post. All submissions require prior approval and must be family friendly and handcraft related.
To submit your things, simply CLICK HERE to contact us.
Wednesday, May 12, 2010
Handmade Spotlight
Today, I'd like to share some awesome graphic artists with you for the Handmade Spotlight. These ladies are so very talented and never cease to amaze me with the the new things they have.
To visit their websites and see more, simply click the link below the image.
Deena Davis
To visit their websites and see more, simply click the link below the image.
| www.countrylifegraphics.com | |
| www.PrimsyDoodleDesigns.net | |
| www.clipart4resale.com | www.digiscrapkits.com |
| www.primliciousgraphics.com | www.shweetpotatodesigns.com |
Thank you for visiting!
Subscribe to:
Posts (Atom)