Showing posts with label sewing room. Show all posts

Monday, April 6, 2015

Office Chair Slipcover Tutorial


If you are thinking about making over your office, sewing or craft room, Amy at Positively Splendid has a wonderful tutorial to pretty up your office chair. Pull out your prettiest fabric and click on the photo above to get full instructions to make a beautiful slipcover for your chair.

Thursday, December 2, 2010

Welcome To My Studio --- Bette's Tomorrows Treasures

Today I thought I would take you for a tour through my studio so you can see where I spend a good portion of my day.

For many years I have taken over a part of the living area of my home and though it is pretty small, only 8 ft x 12 ft, I finally have a dedicated area to work in and I can close the door on the mess and no one else has to see the clutter.

As you come in the door, on the left is the closet area. I  added several shelves in the closet for fabric and keep the fabrics I use most often in here.   I have a shelf against the wall which has a pegboard behind it for my rulers to hang on.

Right next to the closet is my work table.   It is 6 ft wide but I had a big problem working on it because I always seemed to have piles of fabric in my way.   I recently added a long shoe shelf on top of it, against the wall and that has helped a lot with the fabric piles.   I  am now able to keep an area clean for cutting fabric and getting packages ready for the mail.

Under the work table I have several drawer towers for holding supplies and a small file cabinet for papers and patterns.  

To the right of the work table is my ironing station with another drawer tower.
Above this are shelves.   As you will see throughout my tour,   I have used every available space for supplies.
As you move towards the right,  this wall has the only window in the room.    In the corner of the other side of the room is my sewing station.    The table was a kitchen counter.   I made three wood pedestals for it to sit on.  
Under the sewing table I have some more stacking drawers.
And over one wall is my pegboard seen in an earlier organizing post.

As you continue along this wall I have more wall shelves.  
More drawers underneath them.   The colorful storage drawers hold all my printing papers and my postage scale sits on top of it.


And the final corner is my computer station.   I added shelves underneath the desk and small plastic drawers to the side of it hold more supplies.
I hope you enjoyed seeing where I work and write my posts for this blog.   It is still a work in progress as it is only half painted and needs flooring but I love my little space.

Thanks for visiting today.
Bette

Friday, May 14, 2010

Trash to Treasure ---- Office Chair

I have had this chair for many years. It is well made and still in great shape, clean but stained. As you can see the upholstery fabric probably dates back to the 60's with it's orange and brown stripes.

I use it as my sewing chair and decided to update it with chenille slip covers.

I will share with you how I made the covers but I don't have specific patterns as this can be done for any size chair fitting the covers right to the chair.

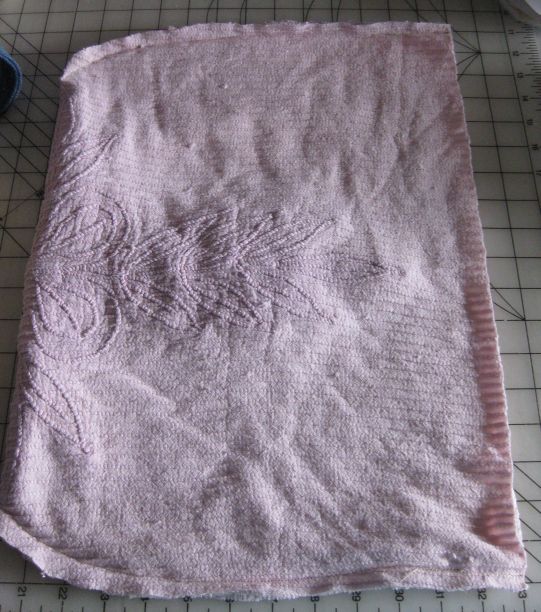
My vintage chenille spread had a design I wanted to incorporate into it so I roughly cut a large enough rectangle of fabric to fold over the seat back.

With the right side of the fabric against the back of the chair, I pinned the sides of the chenille together leaving about 1/2 inch of room between the chair and the pins. Pin from the curve of the top, around the sides and continue straight down at the bottom, not following the bottom curve of the chair or you won't be able to get the cover off and on the chair back.

Following my pinned seams, I sewed both sides of the cover.
I measured the chair back from top to bottom and then added 1 3/4 inches. This is the measurement I used to figure the length of the cover.
Laying the cover on my table I marked my measurement on the slip cover and cut the bottom evenly across.
I resewed the seam allowance and turned it right side out.

For the ruffle on the bottom of the cover I cut two 30 inch lengths of co-ordinating fabric 4 1/2 inches wide. I didn't want a very full ruffle here so only added 20 inches to the diameter measurement of the bottom of the cover.

I sewed the side seams in a 1/4 inch seam and made a small hem on the bottom edge.
I sewed double gathering lines around the top edge of the ruffle, the first one 1/4 inch from the edge and the second gathering line 1/8 inch away from the first.

Pulling both threads together I slightly gathered the ruffle to match up to the bottom of the cover and pinned them right sides together.
I sewed them together following the second line of stitching.

Turn right side out and put it on the chair back.

For the seat cover I laid the chenille on the seat exactly where I wanted the pattern of the chenille to sit and very carefully cut around the chenille using the bottom edge of the seat as my cutting line.

Because this is vintage chenille and I will be sitting on it I decided to add a layer of batting and a lining fabric. I used a quilted muslin for the lining to add more body to it.
Using the chenille as a pattern, I cut the batting and lining to match. I pinned all three layers together with the chenille and lining right sides out and the batting in between. I tacked all three layers together on my machine at equal distances apart. If you don't have a stationary tacking stitch on your machine, you could use a zig zag stitch which is what I did. The fabric layers are so thick they didn't move as I sewed several times in one spot. You could also tack them together by hand.
Then I zig zag stitched the layers together all around the outside edge.


For the ruffle I cut four strips of fabric, 7 inches wide x 36 inches long.
I sewed the sides seams together, leaving one seam open because the ruffle will have to be left open at the back to fit around the metal piece that holds the seat and back together.
I hemmed the sides and bottom of the ruffle and then sewed the gathering lines across the top the same as the seat back ruffle only this time because of the length of the ruffle, I broke the gathering lines up into four parts to make it easier to gather the fabric without breaking the gathering threads as I pulled on them. There is nothing more frustrating than to have your thread break when you are gathering a large expanse of fabric up so I always break up large areas of gathering thread.


Ties: I would have preferred wider ties but I only had a limited amount of the co-ordinating fabric. These are my measurements but you can change them if desired.
Cut two pieces of fabric, 2 1/2 inches wide by 21 inches long. Fold in half and stitch across the bottom and down the sides in a 1/4 inch seam, leaving the last end open for turning.
Turn right side out and press. Pin them to the center of the back seat cover, leaving one inch in between the ties. Stitch across the ends of the ties to secure them.


With right sides together, and starting at the middle of the back of the seat cover, gather the ruffle to fit the cover. Sew the ruffle to the cover.

This was a very easy project and I am very happy with how it turned out.


Monday, May 3, 2010

Sewing Room Organization - Pegboard

Today's organizational post is about the variety of uses for pegboard in a craft/sewing  room.

My sewing room is pretty small,  only 8 ft. by 10 ft.,  so I have had to make use of every available space.   This outside wall is block so very hard to attach anything to it.

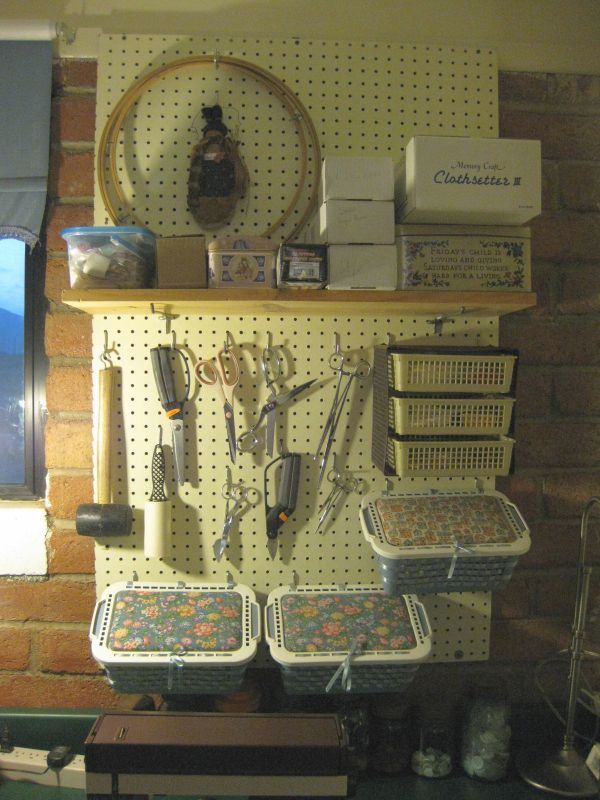
I solved the problem of wasted space by putting a large piece of pegboard in this spot.
I painted it to match my wall paint,  attached it to the wood at the top of the wall and then had to decide how best to use the space.
I added a shelf,  hooked some covered baskets to the bottom and side and even found a spot for the basket holder that has been sitting on a table in my way for some time.


I decorated these baskets a long time ago so I don't know if they are still available but I will show some close up pictures of how they are put together.


For the fabric on the lid,  just cut a piece of cardboard the size of the middle of the lid and cover it with batting and fabric and glue it to the lid.  The front of the lid has 1/4 inch ribbon glued at the sides and then woven through to the middle and tied in a bow.


Weave 1/2 inch wide ribbon through the basket sides.   And the lid is tied to the basket in the back with three pieces of ribbon left a little bit loose so the lid will open and close and tied in a knot.  These baskets are just hooked over a couple of peghooks under the basket lip.

To give you more ideas for using pegboard in the craft room here are some that I found on the internet.  They make all kinds of tools for pegboard so the possibilities are endless for organization.  
This one is from The Blessed Nest blog


This one is used for stamping tools at  iStamp blog.


These next two were found on  Craftster.org


Thanks for stopping by.  I hope you enjoyed the post.
Bette Shaw