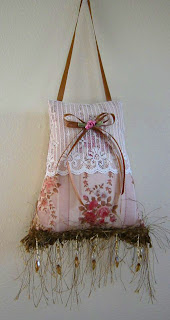
Shabby N’ Chic Sachet
Supplies:
8”
square of doubled floral fabric
5
1/2” long piece of lace, 4” wide
7”
length of beaded eyelash trim
matching
ribbon:
11”
of 1/4” wide ribbon
26”
of 1/8” wide ribbon
one
matching ribbon rosebud
matching
thread
stuffing
optional: lavender or sweet annie buds
Directions:
Cut
the sachet pattern out on doubled fabric.
Lay the piece of lace on the right side of one of the sachet fabric
pieces at the top edge and pin. Trim the
excess lace away on the sides. Baste the
lace to the fabric along the side and top edges
Cut
a piece of ¼” ribbon 11 inches long and pin the ends even with the top edge
where indicated on the pattern. Make
sure the ribbon doesn’t twist and then baste the ribbon to the sachet fabric.
With
right sides together, pin the other
fabric on top. Stitch around the
outside edges in a ¼” seam, leaving an
opening where indicated on the pattern.
The ribbon will be in between the fabric pieces, make sure it doesn’t get caught in the sewn
seam. Turn right side out. Stuff with fiberfil and if desired, you can add some sweet annie or lavendar buds
inside the stuffing.
Stitch
the side opening closed with a slip stitch.
Turn the ends of the eyelash trim under and pin evenly across the bottom
of the sachet. Handsew or glue the trim
to the sachet. Cut two lengths of 1/8”
ribbon, one 12” and one 14”. Tie two
bows and stitch or glue them, together,
to the top of the sachet. Stitch
or glue a fabric rosebud on top of the ribbons.
Slip Stitch – Fasten
thread and bring needle and thread out through one folded edge of
the opening. For the first
and each succeeding stitch, slip needle through the fold and
take a bit of fabric for
about 1/8 inch; bring needle out and draw the thread through.
Continue to take a stitch
from first one side and then the other side, drawing the thread
tight as you work. Make a
knot at the end and bury the thread end inside the tag,


