Showing posts with label wool felt. Show all posts

Thursday, October 24, 2019

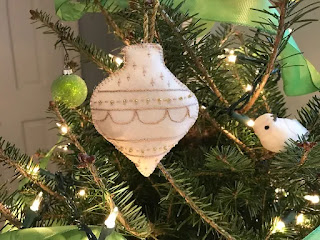
Wool Felt Ornament - Free Pattern

Wool Felt Ornament 

Reminiscent of an old-fashioned Christmas,  this beautiful embroidered Wool Felt Ornament will look amazing on your tree! For more information and the free pattern on Pink Holly Bush Designs blog, click on the photo above. 

Thanks for stopping by today! 


Tuesday, March 27, 2018

Needles-n-Pins Stitcheries: Wool Spring Candle Mat Tutorial

I have just got started doing wool applique candle mats and it is so fun! I have been a quilter for many years and applique is my favorite. I saw so many really neat patterns for wool applique so I thought......hmmmmm......I need to try that. This pattern from Sew Felt is such a pretty pastel spring pattern that I thought I would share it with you. :)


Happy stitching!

Colleen :)


Sunday, April 21, 2013

Jacquie's Upcycle Nation: Jello Mold Pin Cushions

This week's trash to treasure is a quick and simple pin keep made from items most likely in the back crevices of every home: an outdated sweater and a vintage tin Jello mold.
As winter woolies are packed away for another year there is always an odd wool sweater, blanket or scarf that hasn't seen the light of day for more than a few seasons.  No need to be embarrassed by that 1990's cute theme sweater that never seems to disappear!  Now is the time to up-cycle it to new glory!
 Next dig to the back of the kitchen cupboard, behind the cookie cutters and under the mismatched random Tupperware lids to pull out those old vintage metal molds. The smaller single serve size works best for this project.
If not already at home, these tidbits can also be found in abundance at local thrift stores. Just be sure to use items of 100% wool. 
 Machine wash and dry on high heat to "felt" the sweater.  This compacts the fibers to create a stretchy but firm fabric.
After a wooly is chosen and felted, you will also need the following:
*Sharpie marker  *Wood glue  *Scissors
*thread or embroidery floss
*fiberfill* embellishments

With a Sharpie marker, trace 1/2 inch out from the mold onto the folded fabric, right sides together. 
 Don't worry if the circle isn't perfect.  The stretch of the fibers is very forgiving.
Cut the circles out and pin at center, leaving right sides together.
Machine stitch 1/4 - 1/2 inch from circle's edge.
Cut 2 inch slit on bottom side of circle. No need to clip around the outside. (All hail stretchy fabric!)
 Turn right side out and firmly stuff with fiberfill.
 When you think you can't stuff it any fuller, stuff a little bit more! Place the ball inside the mold to test the shape, firmness, and roundness.  Once you are satisfied with the appearance, slip stitch the opening closed.  These stitches should not be pulled tight but left loose like a toothy grin.
Fill the mold with wood glue.  Don't be shy- go ahead and slather it in, leaving the interior top inch clean.  This will prevent any oozing over the outside edge. Once the wool ball is inserted in the tin, place the pin cushion (right side up) under a large book to apply constant pressure as the glue dries. Let it remain drying under pressure for at least 6 hours.
 Wallah!!!  Your Jello mold pin cushion is ready!
 Now you can admire the fabric in its simple state or go hog wild with the embellishments!
 Here are a few examples of pin cushions I have made in the past.  I adore needle felting and find these wee canvases irresistible! 
Theme sweaters offer instant embellishment that turn a fashion faux pas into an heirloom keeper!

Experiment with your own style!  Mix up the molds- any shape and size can be used applying the same steps. These sweet keeps make perfect gifts for the stitcher in your life!

Tuesday, July 20, 2010

Tuesday Tutorial - Felt

Felt is so versatile and so easy to work with.   It is great not having to worry about fraying and hemming.

Today there are so many beautiful things being made with it,  too.   Here are some tutorials I found around the web.

I love these penny purses from Penny Rugs and More.


Here is a beautiful flower made from felt at Yoonie At Home.


Here is a lined felt storage basket from Gingham Cherry.


Make some pretty felt roses at Mama Moontime.


And if you want to try your hand at making penny rugs,   this blog has loads of information for you along with some free penny rug patterns.    Craft Stew


I hope you have been inspired to try something new with felt today.
Thanks for visiting.
Bette Shaw
www.byyourhands.com

Would you like to sponsor a giveaway?  Are you interested in promoting your store or blog at a very reasonable cost?   If so, just email me. I would be happy to send you the details.
                                          byyourhandsblog@gmail.com

Tuesday, July 13, 2010

Tuesday Tutorial - Cupcake Wrist Pincushion

I have been wanting to make a wrist pincushion for some time now and yesterday was finally the day. I am sharing it here with you today.   Hope you enjoy making it as much as I did.    Bette


Supplies Needed:

Jar Lid
Two Colors of Wool Felt
Matching Embroidery Thread
Lace
Ribbon Rose
Polyfil Stuffing
Velcro


I used the lid off a jar of peanuts as it was the perfect size, 2 1/2 inches in diameter, so that I wouldn't be missing the pincushion and poking my arm with pins.

Lay the jar lid on top of your felt and draw around the circle. Cut on the outside of your pencil line.


Measure around the side of your lid. Cut a piece of felt this measurement plus 1/16 of an inch extra for a slight overlap. The width of this piece will be 1 1/4 inches.
Wrap this side piece around the lid and starting at the top edge whip stitch the sides together.


Add the circle for the bottom, and whip stitch the circle to the side.


Cut a 5 1/2 inch circle from your other piece of felt.     Gather all the way around.    Stuff with a large handful of polyfil stuffing and pull the gathers up,  leaving a quarter size opening.


The lid goes inside the bottom of the pincushion.   Add some stuffing to the lid.
Push the top of the pincushion into the bottom and whip stitch the top and bottom together.


I handstitched a piece of lace around the cupcake where the two colors meet.   Then I sewed a ribbon rose to the top.


Now cut a piece of your main color felt 2 1/2 inches wide by the measurement of your wrist plus 2 inches for overlapping.   Fold the sides in and overlap slightly.   Stitch down the seam.


Then cut a 1 3/4 inch piece of velcro.    Stitch one half of the velcro on one end of the wristband and then turn it over and stitch the other half of the velcro to the other end .


Now,  center the strap in the middle of the bottom of the cupcake and whip stitch it to the bottom on both sides of the band. 


And that's it,  you are all done.    Enjoy!

Thanks for visiting today.
Bette Shaw
www. byyourhands.com