A few days ago, I spent the afternoon making a t-shirt pillow with my 4 year old son. He was actually quite impressed with the outcome and since I don't sew as much as I used to, he had lots of questions about the sewing machine and what pins were used for. LOL
These pillows can be made from any size t-shirt that's in good condition. We made two of these gems, and both were made from "too small" t-shirts that my boys loved. (What boy doesn't like camo?)
Here's how it's done...
Examine the shirt and make sure it is free of holes and/or stains.
Turn the shirt inside out and smooth out all wrinkles on a flat surface. Be sure to remove any tags that might get in the way.
Line up the sleeves and bottom hem and pin. You will be sewing these openings closed.
Sew across both sleeve openings and across the bottom. I used the stretch-stitch setting on my sewing machine since the fabric has some stretch to it.
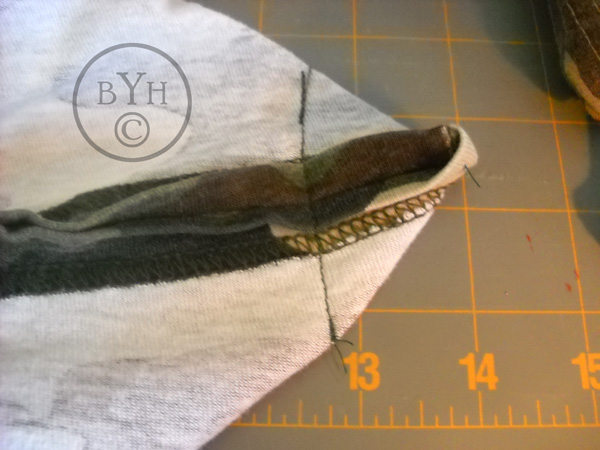
Now that the sleeves and bottom are sewn, we need to make a "box seam". Take hold of one corner at the bottom. Line up the bottom seam you just made with the side seam. You will be forming a triangle with the fabric.
To make sure the seams are lined up, I always stick a pin thru the middle of each seam.
Smooth out the corner, remove the pin that you just put in the middle of the seams, pin and sew across the corner about an inch and a half away from the end point.
Trim off the excess leaving a 3/8 inch seam... or something close. Just don't trim it too close.
Do this on both sides of the bottom seam.
Now, turn the shirt right side out through the neck opening, making sure to push all the corners of the sleeves and bottom out.
Stuff the shirt with your favorite stuffing. I used polyester fiber stuffing. Be sure to fill it full to make a nice even pillow.
Now we'll pin the neck opening closed. This can be a little tricky if it's stuffed really full, but it's not hard to do. Take your time.
After pinning, I sewed the opening closed by hand with a blind hem stitch, but you could also whip stitch it closed.
The outcome should look something like this...
These pillows are fun to make from all sorts of t-shirts and they're really comfy too. You could use school themed t-shirts, shirts from a vacation, or perhaps something your children have outgrown.
Have fun with it!
Deena Davis
www.ByYourHands.com
Tuesday, May 4, 2010
Let's Make a T-Shirt Pillow!
Monday, May 3, 2010
Sewing Room Organization - Pegboard
Today's organizational post is about the variety of uses for pegboard in a craft/sewing room.
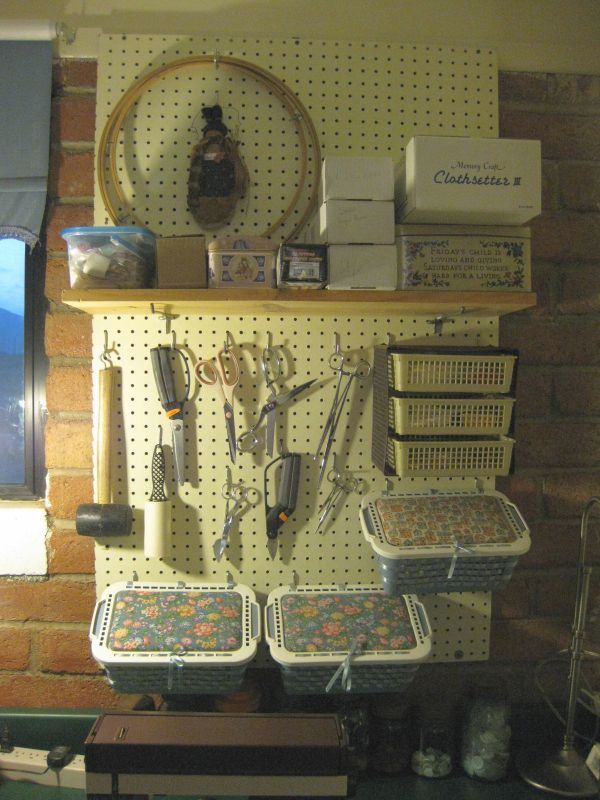
My sewing room is pretty small, only 8 ft. by 10 ft., so I have had to make use of every available space. This outside wall is block so very hard to attach anything to it.
I solved the problem of wasted space by putting a large piece of pegboard in this spot.
I painted it to match my wall paint, attached it to the wood at the top of the wall and then had to decide how best to use the space.
I added a shelf, hooked some covered baskets to the bottom and side and even found a spot for the basket holder that has been sitting on a table in my way for some time.
I decorated these baskets a long time ago so I don't know if they are still available but I will show some close up pictures of how they are put together.
For the fabric on the lid, just cut a piece of cardboard the size of the middle of the lid and cover it with batting and fabric and glue it to the lid. The front of the lid has 1/4 inch ribbon glued at the sides and then woven through to the middle and tied in a bow.
Weave 1/2 inch wide ribbon through the basket sides. And the lid is tied to the basket in the back with three pieces of ribbon left a little bit loose so the lid will open and close and tied in a knot. These baskets are just hooked over a couple of peghooks under the basket lip.
To give you more ideas for using pegboard in the craft room here are some that I found on the internet. They make all kinds of tools for pegboard so the possibilities are endless for organization.
This one is from The Blessed Nest blog
This one is used for stamping tools at iStamp blog.
These next two were found on Craftster.org
Thanks for stopping by. I hope you enjoyed the post.
Bette Shaw
My sewing room is pretty small, only 8 ft. by 10 ft., so I have had to make use of every available space. This outside wall is block so very hard to attach anything to it.
I solved the problem of wasted space by putting a large piece of pegboard in this spot.
I painted it to match my wall paint, attached it to the wood at the top of the wall and then had to decide how best to use the space.
I added a shelf, hooked some covered baskets to the bottom and side and even found a spot for the basket holder that has been sitting on a table in my way for some time.
I decorated these baskets a long time ago so I don't know if they are still available but I will show some close up pictures of how they are put together.
For the fabric on the lid, just cut a piece of cardboard the size of the middle of the lid and cover it with batting and fabric and glue it to the lid. The front of the lid has 1/4 inch ribbon glued at the sides and then woven through to the middle and tied in a bow.
Weave 1/2 inch wide ribbon through the basket sides. And the lid is tied to the basket in the back with three pieces of ribbon left a little bit loose so the lid will open and close and tied in a knot. These baskets are just hooked over a couple of peghooks under the basket lip.
To give you more ideas for using pegboard in the craft room here are some that I found on the internet. They make all kinds of tools for pegboard so the possibilities are endless for organization.
This one is from The Blessed Nest blog
This one is used for stamping tools at iStamp blog.
These next two were found on Craftster.org
Thanks for stopping by. I hope you enjoyed the post.
Bette Shaw
Labels:
by your hands,
craft room,
organize,
pegboard,
sewing room
Saturday, May 1, 2010
Handmade Blog Party Sunday
Today we are starting a new Sunday feature.
We are going to show you what we have made this week and then we want to see the handmade items you made.
Bette's Handmades:
A couple of things I made this week are this Sunflower Feedsack Pillow from an image found at www.ewenmeprintables.com
and I also made several of these purse organizers.
They can be found in my Etsy shop, Handmade By Bette
Deena's Handmades:
This first one is a set of printable hang tags called "I Dig You". These were inspired by my 9 y/o son. He said "Mom, you really need to make some tags with dogs on them." I went shopping for graphics on one of my favorite sites, www.CountryLifeGraphics.com and I found the sweetest dog graphics, EVER!
I also made these Americana hang tags from some vintage graphics. I love working with vintage art. Both of these items can be found on www.ewenmeprintables.com
Show Us Yours:
So, now it’s YOUR turn for the party this week! What have YOU made this past week. Add your link to the Linky list and remember our guidelines for the party:
1. Add your permalink to the link list, which is the actual post that you did for this party, NOT your general blog url. To get the actual post, after you publish the post, just click on the title and THAT will be your party post url.
2. Please add our button to your post or blog OR at least link back to this post in your post. It’s common courtesy to link back to the person having the party, so that all of your readers can find it too.
3. Please do NOT link to an Etsy shop or something similar. This party is for sharing your handmade items only.
We are going to show you what we have made this week and then we want to see the handmade items you made.
Bette's Handmades:
A couple of things I made this week are this Sunflower Feedsack Pillow from an image found at www.ewenmeprintables.com
and I also made several of these purse organizers.
They can be found in my Etsy shop, Handmade By Bette
Deena's Handmades:
This first one is a set of printable hang tags called "I Dig You". These were inspired by my 9 y/o son. He said "Mom, you really need to make some tags with dogs on them." I went shopping for graphics on one of my favorite sites, www.CountryLifeGraphics.com and I found the sweetest dog graphics, EVER!
I also made these Americana hang tags from some vintage graphics. I love working with vintage art. Both of these items can be found on www.ewenmeprintables.com
Show Us Yours:
So, now it’s YOUR turn for the party this week! What have YOU made this past week. Add your link to the Linky list and remember our guidelines for the party:
1. Add your permalink to the link list, which is the actual post that you did for this party, NOT your general blog url. To get the actual post, after you publish the post, just click on the title and THAT will be your party post url.
2. Please add our button to your post or blog OR at least link back to this post in your post. It’s common courtesy to link back to the person having the party, so that all of your readers can find it too.
3. Please do NOT link to an Etsy shop or something similar. This party is for sharing your handmade items only.
Friday, April 30, 2010
Trash to Treasure --- Bed Frame Benches
Today's Trash to Treasure is about using old bed frames to make wonderful benches like these. What a wonderful second life for these old beauties.
You will find the tutorial for this pink beauty here. http://judysturman.typepad.com/in_his_grip/2010/04/bed-to-front-porch-bench.html
And here are a few of the benches featured on this blog. http://www.robomargo.com/bench.html
And even chairs made into a bench.
And here is one more I came across on the internet that had been sold at an antique auction.
You will find the tutorial for this pink beauty here. http://judysturman.typepad.com/in_his_grip/2010/04/bed-to-front-porch-bench.html
And here are a few of the benches featured on this blog. http://www.robomargo.com/bench.html
And even chairs made into a bench.
And here is one more I came across on the internet that had been sold at an antique auction.
Labels:
bed frame benches,
by your hands,
diy,
trash,
trash to treasure
Wednesday, April 28, 2010
Handmade Spotlight
Each Wednesday, we'll be spotlighting some items that are made "by your hands".
Today, we're featuring some really pretty pillows that we found on etsy.com
Thanks for visiting us again!
Deena Davis
www.ByYourHands.com
Today, we're featuring some really pretty pillows that we found on etsy.com
Thanks for visiting us again!
Deena Davis
www.ByYourHands.com
Labels:
Handmade Spotlight,
handmadespotlight,
Spotlight
Subscribe to:
Posts (Atom)