Showing posts with label trash. Show all posts

Saturday, March 28, 2015

Whimsical Coffee Can Birdhouse Tutorial


Here's a great tutorial that is not only whimsical but practical too!!! Would look fantastic in your garden. You'll love it and so will your feathered friends.

For the full tutorial, click on the photo above.

Monday, March 16, 2015

French Flower Bucket DIY


Such an easy and pretty French Flower bucket! Click on the photo above for the tutorial and the downloadable graphic!!!


Thanks for stopping by today!


Wednesday, February 25, 2015

Kidz Korner - Ladybugs From Egg Cartons


How cute are these ladybugs? Your little ones will have a great time crafting these and putting them around the house. Great way to recycle those egg cartons too!

For complete instructions, just click on the photo above! Amanda of Crafts by Amanda has pages of great crafts ideas for kids as well as adults. You'll certainly want to follow her blog to keep up with the latest crafts, DIY and tutorials.


Thanks for stopping by today!


Wednesday, February 18, 2015

Kidz Korner - Metal Embossing


This is a great craft for Kidz of all ages! Suzy at Suzy's Artsy Craftsy Sitcom has posted a wonderful tutorial with lots of pictures and free designs you can use to teach and create with your kids. Even the grownups can get in on the fun!!


Click on the photos above for the complete instructions for metal embossing.

Suzy even has a video posted by Mona of the Craft Klatch to help get you started on metal embossing today!

Lots more posted on Suzy's site! Make sure you sign up to have her episodes delivered right to your inbox.


Thanks for stopping by today!


Monday, February 16, 2015

Vintage Chair Drink Stand


Isn't this a great way to repurpose an old time worn chair? Looks wonderful and would be perfect for any outdoor party...maybe even a bridal shower or a barn wedding. Susan at Oh My! Creative repurposed this chair in no time flat. Have an old chair that can be put back to work? Click on the photo above for Susan's instructions with beautiful pictures.

Susan has lots of great DIY projects, recipes, holiday and entertaining ideas, I just know you'll be visiting her for a while! So grab your favorite beverage and enjoy all that Susan has to share by clicking her picture below.


Thanks for stopping by today!


Friday, February 13, 2015

Today's Featured Shop - Kissinglass


Today's featured shop is Kissinglass. All items found on Kissinglass are one of a kind, recycled glass or found originals made by owner, designer and artist, Adrianne. You will find her early in the morning working away on her art.


Two Snowy Owls


Two Sweet Cardinals


Robin in a Rainbow Tree


Thanks for stopping by today!


Monday, February 9, 2015

How to Paint a Kitchen Table


If you've wanted to try your hand at painting a care worn table, Kate from Centsational Girl has a fantastic tutorial with lots of great pics to give your table new life. Just click on the photo above for complete instructions.

Thanks for stopping by today!


Monday, September 16, 2013

Jacquie's Up-Cycle Nation: Pick Your Poison

 Old-timey poison labels add vintage pizazz to any Halloween décor!  But crafter beware!! These creepy cheapies are so easy to make you could easily get carried away!  (Oh who am I kidding!!? Crafters can never have TOO much of anything!)
 Using cast-off glass bottles, a standard printer and Mod-podge, these spooky pieces can be made in minutes from the recycle bin.
Finding awesome vintage labels on-line is half the fun! Popular graphics sites like The Graphics Fairy  offer copyright-free labels ready for download. Simply save the image to the computer and print out on everyday white copy paper.
After cutting out the labels use sepia toned stamping ink to add splotchy aging to the labels and darken the edges.
Apply Mod-podge to the back of the label and adhere to the glass bottle.  Once the Mod-podge has dried, brush another small amount of matte Mod-podge to the label surface for protection.
Larger bottles can be turned into candle lanterns using decorative grass, wire, and battery operated tea lights.  (I found these black tea lights in Target's $1 section.)
Wrap wire around bottle neck making at least 5 rounds for extra stability.  Use a smaller cut of wire to create a handle.   Drop in the decorative grass and tea light and ENJOY!  The poison bottles are now ready for all your creepy decorating plans! 
LOVE  &  UP-CYCLE NATION!
Jacquie Wheeler
Hand of Bela Peck

Saturday, June 18, 2011

Trash To Treasure ----- Chair Garden

Look at what you can do with an old chair you no longer have a use for.   


You can find the directions on how to make one of these garden chairs on http://www.bhg.com/

Basically you paint your chair.
 Cut a hole in the middle of the seat.   Add chicken wire and line with coconut fiber and you are ready to plant your favorite flowers in your chair.

Thanks for visiting today.    Now go find that old chair and get busy making one of these for yourself.
Bette

Friday, January 28, 2011

Trash to Treasure ---- Boxes

Here are some clever makeovers for boxes you would ordinarily throw away.   What pretty ways to organize your home.

Instuctions on  Life in Rehab.

These decorated cereal boxes are a great project to do with kids.  Instructions on Meyamo

The how-to for this box is on Your Decorating Hotline.

Fabric covered boxes by The Borrowed Abode.

Hope these makeovers inspires you to recycle those boxes you have around your house.
Thanks for visiting today.
Bette

Friday, January 7, 2011

Trash to Treasure ---- Old Dishes

Have some old dishes taking up space that are too pretty to part with?   Here are some ideas for repurposing  old dinnerware.

Here is a dinnerware wreath from RoboMargo.


Here are some pretty mosaic flower pots made from broken china made by Creative Jewish Mom.


Make and unusual lamp from old dinnerware.   Learn how on Remodeloholic.

And finally,  how about adding mirrors to the middle of unique plates. with Apartment Therapy.

Hope this sparks some ideas for you on ways to use your old dishes that you can't part with.
Thanks for visiting today.
Bette

Friday, October 22, 2010

Trash to Treasure --- Repurposed Drawers

Have you ever had a piece of furniture that wasn't worth salvaging but the drawers were still good?     I did recently which led me to look for some ideas to use that drawer for another purpose.

This cute dollhouse was made from two nightstand drawers.  Tutorial on   Nice Girl Notes.


Can  you tell this shelf started life as a drawer?   Trash2Treasure tells you how.


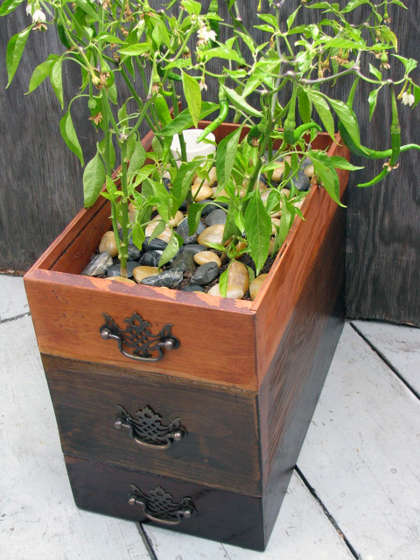
This takes a bit of work to put together but it sure is unique.   Instructions for making this self-watering planter from 3 dresser drawers can be found on Instructables.com


This is what I am going to do with my drawer.   Make a pullout underbed storage drawer.   I don't remember where I saw this one but do know that they added castors to the bottom and a cover over the top of the drawer.   The cover was tacked down on one side and the other side has a strip of velcro glued on for easy opening of the cover.


And if you don't have any excess drawers you can make your own underbed drawers from scratch.  BHG tells you how.


Thanks for visiting today.
Bette

Friday, October 15, 2010

Trash to Treasure --- File Cabinets

Our guest poster today is Lindy from Lindy Cottage Hill Blog.


I have a dirty little secret. These simple little covered night tables with their very clean lines


started out life as one of these...

Nasty, I know.  But true.  I cleaned, sanded, and spray painted them using the last drop in more than one can and color of paint.  Waste not, want not.  It wasn't going to show anyway and wouldn't really bother anyone I know -- except maybe my mother.

I expanded the size of the top just a smidge because I wanted a little more space on top and because I needed the cover to drop down freely over the sides.   I glued a 1/2" piece of plywood the dimensions I wanted to the top using liquid nail and a small child to sit on it for a couple of hours while the glue dried.  Not really,  I used heavy books but I like the "small child" idea.


The topper was simple -- just four flaps cut to fit the four sides and 4 smaller flaps (mine are about 10" wide) cut to cover the corners.  I added the tiny bows to "cute" it up a little and to keep everything in place. 

All the extra storage comes in really handy.

Lindy
http://lindycottagehill.blogspot.com/

Friday, September 24, 2010

Trash to Treasure --- Makeovers


Trash to treasure can be as simple as repainting or refurbishing a chair, lamp, table,  etc.    But today I want to share some unique makeovers.  

Would you recognize these from what they started out as?

I think this first one could have started life as a bed headboard.


And here is the transformation.   Directions found at Faith's Place.


Here is a doll cradle that can be found at Junk Blossoms.


Transformed into a shelf.


This was a gun cabinet in it's former life.


But look at this beautiful pantry transformation by Pepper Towne.


And finally these two doors at the hands of Brendan Carpenter

became this beautiful trunk.


I hope today's post sparked some creativity in you.   If you have a makeover you would like to share with our readers,  please email me at byyourhandsblog@gmail.com

Friday, September 10, 2010

Trash to Treasure --- Shutters

Today I am sharing some nifty ideas on what to do with old shutters.

I love this first idea from She's Smart.

 The shutter is side ways,   add decorative brackets and a shelf across the top and hooks on the bottom.   Great for an entry way.

Here is an unusual use for shutters.   Learn how to make an earring holder on Eating, Etc.


Make a plant stand out of them.    Instructions on Ehow.


Here is an altered art note holder from Altered Artworks.


Then of course you can always restore them and use them indoors,


or outdoors.


Thanks for visiting today.
Bette
www.byyourhands.com