Tuesday, October 26, 2010

Tuesday Tutorial ---- Penny Rugs and the Blanket Stitch

Penny rugs date back to the 1800"s.   Frugal women used wool fabric scraps to make table mats,  mantle covers and even bed covers.   They were called penny rugs because they used coins as a template for cutting their pieces out.

The main stitch you need to know to stitch a penny rug is called a blanket stitch.    It looks like this:


There is a video here that will take you through the steps to make this stitch.   It is a great stitch for a lot of other things besides penny rugs.    http://www.needlenthread.com/2006/11/buttonhole-stitch-video-tutorial.html

You can find the basic instructions for making a penny rug here.  http://pennyrugsandmore.blogspot.com/2009/05/makings-of-penny-rug-by-colleen.html
 
She also has a tutorial to make this penny purse on her blog.   http://pennyrugsandmore.blogspot.com/2008/05/penny-purse-tutorial.html


These penny rug coasters are an easy beginner project.    http://weefolkart.com/?q=node/150


The blanket stitch is a versatile stitch and can be used as an edging on a lot of other projects.     Use it to edge a sweatshirt jacket,   a baby blanket,   or to applique one fabric on to another.

Monday, October 25, 2010

Getting Organized - Holiday Gift Shopping Tips

Today we have guest writers from, www.entwinedvinesjewlery.blogspot.com. Please welcome Tina and Tammy as they share their Holiday Shopping Tips with us.

......................................

The holidays are upon us, if you haven't already you will soon begin the time honored tradition of gift giving.

Are you someone who plans ahead or waits till the last minute? Whatever end of the spectrum you are on or if you are somewhere in the middle, the following list is a great tool to make your shopping expeditions less chaotic and keep you within your budget.

Holiday Shopping Tips:

1.) Set a per person budget. I have found that a per person budget works best to keep from overspending.

2.) Ask for a Christmas list. Some of you are probably thinking this takes some of the magic out of it, but like me, you probably have at least one person on the list you have no idea what to get for them. And let's face it in today's tight economy sometimes a practical gift is more appreciated than a whimsical gift. No matter how much the person may like the whimsical gift.

3.) Make a list of people you are shopping for. There is nothing worse than getting home thinking you are done and find you forgot to buy a gift for someone.

4.) Add to your list of people an idea of what you are looking for. Don't forget to think of handmade items. Handmade gifts add a personal touch to your gift giving.

5.) Consider shopping online and avoiding the malls altogether.

6.) Plan your shopping trip -- Group your gift list based on the different stores, categories, types of items you are looking for, then plan your route. You will save a great deal of time this way.

7.) Find a shopping buddy -- stores in general are crazy busy this time of year, it is easy to miss deals. With a shopping buddy you will cover more territory, saving you time and catching deals missed when shopping solo.

8.) Bring your own shopping bags -- not only is it environmentally friendly, they are easier to carry and keep track of.

9.) Consider shopping for Handmade items online. -- Yep, I am all for avoiding those malls and totally appreciate a handmade gift over a mall special.

10.) Remember Yourself --- It may be the season of giving, but we all work hard and deserve to treat ourselves too. Whether this be a large item or a small item, you are deserving and taking care of yourself allows you the energy and humor to care for others.

Sunday, October 24, 2010

Handmade Blog Party - What Did You Make This Week

Welcome to our blog party today.   The holiday selling season has started and we would like to see your new handmades you have for sale.   Just add your links below to show us what you are selling this season.

You are allowed to add 3 links to your shops. 

The rules are simple:

1. Follow our blog

2. Handmade items only.

3. You may list up to 3 items.

4. Family friendly items only.

The success of this link party depends on the participants so spread the word to your friends, visit the shops, post about it on your blog, in a forum or on your favorite social networking site, grab the button and put it on your blog or website.

Just click on the Add Your Link button below and add your items.

And if you would like to add a link to the party you can grab this button below.


Saturday, October 23, 2010

Time Saver Recipes - Easy Crock Pot Chili

This is a very mild and meaty chili. I like to serve it over corn chips with a bit of shredded cheddar and a dollop of sour cream on top.

2 lbs. ground beef
2-3 Tb. chopped onion
1 clove garlic
1 - 15 oz. can chili beans
2 - 15 oz. cans diced tomatoes
2 T. brown sugar
1 can of water
chili powder
salt
pepper


In a skillet, brown 2 lbs. ground beef with onion and garlic, drain fat.

Add hamburger, onion/garlic mixture to crock pot along with remaining ingredients.

Season to taste with chili powder, salt and pepper.

Cook on low for 8-10 hours or on high for 4-6 hours with lid slightly ajar so steam can escape. Stir occasionally.


Deena Davis
www.byyourhands.blogspot.com

Friday, October 22, 2010

Trash to Treasure --- Repurposed Drawers

Have you ever had a piece of furniture that wasn't worth salvaging but the drawers were still good?     I did recently which led me to look for some ideas to use that drawer for another purpose.

This cute dollhouse was made from two nightstand drawers.  Tutorial on   Nice Girl Notes.


Can  you tell this shelf started life as a drawer?   Trash2Treasure tells you how.


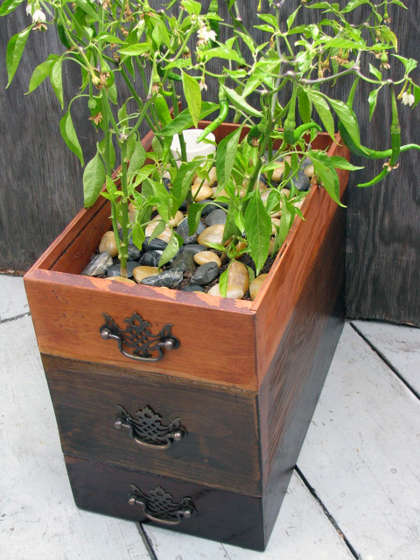
This takes a bit of work to put together but it sure is unique.   Instructions for making this self-watering planter from 3 dresser drawers can be found on Instructables.com


This is what I am going to do with my drawer.   Make a pullout underbed storage drawer.   I don't remember where I saw this one but do know that they added castors to the bottom and a cover over the top of the drawer.   The cover was tacked down on one side and the other side has a strip of velcro glued on for easy opening of the cover.


And if you don't have any excess drawers you can make your own underbed drawers from scratch.  BHG tells you how.


Thanks for visiting today.
Bette