Wednesday, October 30, 2013

Witches Stiches - Grungy up any bottle or can


If you love the grungy old cans and bottles you see in all the prim shops and want to do a few yourself, I have a few easy steps to a great prim grungy look.
You will need the following:

A glass bottle or tin can, (any bottle or can will do), a piece of fabric. Make sure it is large enough to cover the bottle or can top opening and hang over the sides by at least2 inches, a piece of string or twine long enough to tie around the opening of the bottle or can, a can of flat black spray paint, a can of flat clear spray sealer, a bottle of cinnamon, paper label,  some pieces of printer paper and craft glue. (as always I use the kind in the gold bottle)

Step 1 - Clean your bottle or can and dry it. Place your item on a piece of paper, (instead of printer paper you can also use the pages from an old magazine. Just tear them out one at a time.) Now spray your bottle with the flat black paint. Please make sure you do this outside or in a very well-ventilated area.  I do mine outside. Make sure it is cover well. Do not spray to close to your item or it will drip. Let dry.
Step 2 – Once your item is dry glue your paper label on. You can make your own label. I did it in paint or you can buy one of the many on etsy. Let the label dry.

Step 3 – Now it is time to give it a great grungy look with cinnamon. You will do this one side at a time.  Place your bottle label side down and spray the back with the clear spray. Now you have to act fast, sprinkle the cinnamon on your item where you have sprayed it with the clear spray. The cinnamon will stick to the wet clear spray. How much you want to put on is up to you. You can do a lot or just a touch. I cover the entire item. I like it good and grungy. Repeat on all sides. Make sure you DO NOT spray your label with the clear spray. You do not want to cover the label with cinnamon. I use a piece of paper the size of the label to protect it. When the entire bottle or can is covered tap off excess and set aside for a few minutes to dry. Once it is dry, you are going to give your item another clear coat spray. This will seal the cinnamon so it does not come off everywhere and it also makes it look a bit darker. Now set it aside at least 2 hours to let it dry.

Step 4 – Now add the cloth and tie. You can cut your cloth piece in a circle or a square they both look great. Dot some glue on the top rim of the bottle or can. Lay your fabric on it. Now tie the fabric on with your choice of string. You can embellish with a paper tag. These look great sitting in a cupboard or on a shelf.

Enjoy and as always if you have any questions please give me a shout. Thank you for reading, Faith

Handmade Spotlight - Orange You Glad it's Fall


Tuesday, October 29, 2013

Needles-n-Pins Stitcheries: How To Make Wild Cranberry Jelly


On my blog the other day I posted how to make wild cranberry jelly. I thought you would also like to read about how to do this. We pick our own wild cranberries in the fall and we make jelly and syrup out of them. Taste pretty good come January! :)

Now, this is just the way I make jelly. I have experimented and trial and error to get my process down. I am sure there are many other ways of doing this, but this is how we do it. 

Supplies you will need will be:

Berries
Cook pan
Bowl
Sugar
Lemon juice
Liquid fruit pectin
Jelly jars and lids
Small plate to test jelly. Put this in the freezer so it is cold when you test.


First you need to pick your berries. We have so many berries up here it is hard to get them all picked. These are the high-bush cranberries we picked. A lot of the jelly process is the same for all of the berries you might pick. A big part of the process is how much natural pectin the berries have and the ripeness of the berries which varies from year to year. Pectin is what makes the jelly jell. You will just have to test and see what works that year.
 
 
First step is to sterilize your jelly jars. I do this by putting them in a large pan of boiling water for 10 minutes or until I have all my other supplies set up and ready to go.


Then measure 4 cups of berries to 2 cups of water. Put on the stove and bring to a boil.


Cook for approximately 7 minutes or until the berries burst. This whole jelly making process is a two man job so you may need some help. Notice hubby is the "stirrer". :)

 
After you cook the berries you will need to put the cooked berries in a cheesecloth bag like this one. This is a stock picture since I forgot to take a picture of this step. :(  Once the berries are in the bag you will need to squeeze the berries to get the juice from the berries as that is what you need for the jelly. Now be careful with this step the berries are very hot! I usually hold the bag and hubby uses my "pinchers" as I call them. Don't know the official name, but the ones you can grab hot things with. :)  

 
After you squeeze the berries you will have just berry juice left. Next you will need to measure the juice and put it in the cook pan again. I do 1-1 ratio. I use 2 cups of juice to 2 cups of sugar. You will be able to experiment what works best for you. Bring the juice to a boil and add the sugar until it is dissolved.


Next add in 3 teaspoons of lemon juice to the pan and appx 1/2 package of liquid pectin to start with. Cook this appx 5 minutes. Now as the jelly cooks it will form a head on it so be careful that it doesn't over boil. If the color changes stop cooking immediately. You will need to test the jelly on the small plate to see how it is jelling. Take a little spoonful of the jelly and put it on the plate and turn the plate at an angle to have it run down the plate. If it seems like it is jelling ok and is slowly running down the plate it is good to go. If not, then add a little more pectin and another teaspoon of lemon juice.

 
Once jelly is jelling and ready to go pour into the sterilized jars. Let the jelly cool for awhile before you put the lids on. That way you can see if it is jelling also.


The hardest thing to gauge working with wild berries is the natural pectin and ripeness. Each year is different and each years growing conditions are different. One year they will be great and the next won't be. Over the years we have just worked with whatever the berries are for that year, but there is nothing better that having your own jelly in the middle of the winter. You can also make syrup from these berries which is another tutorial one of these days. Very good on pancakes!
 
Well I hope that wasn't too complicated. It is really pretty easy once you get your procedure down and know what you are doing...and yes....hubby and I say every year....."now how did we do this and that"! :)
 
 
Thanks for joining me and have a great week!
 
Colleen :)


Monday, October 28, 2013

Jacquie's Up-Cycle Nation: Spirited Frocks

Halloween week has arrived!
 Halloween is the perfect up-cycle opportunity to create magic out of cast offs and everyday items.  These Etsy up-cycle artists have you covered for Halloween, Renaissance Fair, community theatre and every other costume-worthy occasion.
 
 
Let out your inner monster with up-cycled creepy embellishments from KendallMade.  Creations in this Etsy shop clothe all ages.  Perfect for pint sized frights and everyday fun.
This fabulous fox mask, available from Pete Talbot Art, will set you apart from the everyday Halloween costume.  The best part? It's so well done it can double as wall art the other 364 days of the year.
Irishandmore makes beautiful, quality costumes year round.  Up-cycled from bridal sample dresses, this shop is a must for the Renaissance Fair, Dickens celebration or specialty themed occasions.
Every great costume is topped with the perfect headpiece.  The Dusty Raven makes a stunning crown from recycled wire and his shop is filled with up-cycled wire delights perfect for decorating yourself or your home.
  Want to make your own customized spirited frock? This up-cycled sweater coat tutorial is offered by Katwise.  Her Etsy shop offers vibrant warmth for ever occasion.  Finished coats are also available.
 Please remember to ask shop owners about their policies regarding custom orders and express shipping.
Have a safe and Happy Halloween!
 
LOVE  &  UP-CYCLE NATION!
Jacquie Wheeler
Hand of Bela Peck

Sunday, October 27, 2013

Blog Party Sunday --- Show Us Your Handmades

Welcome to our Blog Party Sunday. We would love to have you show us what you are crafting.

You are allowed to add 3 links to your shops or your blog.

The rules are simple:
1. Follow our blog
2. Handmade items only.
3. You may list up to 3 items each week.
4. Family friendly items only.

The success of this link party depends on the participants so spread the word to your friends, visit the shops,  post about it on your  blog, in a forum or on your favorite social networking site, grab the button and put it on your blog or website.
Just click on the Add Your Link button below and add your items.
And if you would like to add a link to the party you can grab this button below.


Saturday, October 26, 2013

It's Giveaway Time -- Win Free Advertising For Your Handmade Shop

Welcome to another giveaway.   Today we are giving away a six month listing on our new website,   Handmade Artisan Connection, to anyone with a handmade shop.


You can earn up to three entries by doing the following...

1. Earn one entry just for leaving a comment.  Be sure and leave your email address so we can contact you if you win.

2. Earn one extra entry by becoming a follower of this blog thru Google Friend Connect or Linky Followers.. Already a follower? Just let us know so we can give you credit.

3. Earn an extra entry by sharing the link to this giveaway on your Blog, Facebook, Pinterest or Twitter. Be sure and let us know you have done this and where.

The giveaway will start today, Saturday, October 26. The last day to enter will be November 15, 2013 and the winner will be announced on November 16, 2013. We will announce it here and contact you by the email address you have left. 

Have fun and good luck!

The Handmade Artisan Connection is your connection to the artisans who make and sell their own products, many of them one-of-a-kind.

Support handmade by shopping for unique goods directly from the artisan who creates with love, care and attention to detail.

If you sell your own handmade wares,  you'll want to be listed on Handmade Artisan Connection! 
Click Here to get listed on Handmade Artisan Connection Online Catalog today! 

If you're looking for one-of-a kind Handmade products, you'll want to stop by often! 

Join our mailing list so you can receive updates when we have a new artisan listing or new products have been added to our artisan's shops.
We mail our newsletters out twice a month on the 1st and 15th.
We never share your email address.


 Subscribe to our mailing list * indicates required


Email Format


Would you like to sponsor a giveaway? Are you interested in promoting your store or blog. If so, just email us.
We would be happy to send you the details. byyourhandsblog@gmail.com

Friday, October 25, 2013

Today's Featured Shop -- Snowman Collector

Today's featured shop is the Snowman Collector.     Snowman aren't only for Christmas.   There are a lot of snowmen collectors out there and Sheila specializes in making snowmen all year round.

Snowmen Bloom in Winter Centerpiece


Large Snowman Will Work For Snow


Cheerful Snowman Spring Nodder

Merry Christmas Little Fabric Snowman

Be sure and visit Sheila's shop to see all she has to offer.    https://www.etsy.com/shop/SnowmanCollector

Thursday, October 24, 2013

Witch’s Stitches – Making a “kind of” Feather Tree

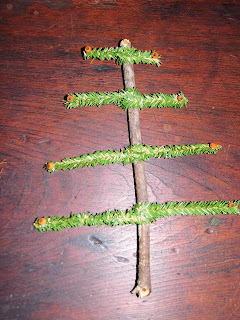
I love feather trees. I have one I put up every year that stands 6 feet tall. My kids call it the Christmas stick. The nice thing about a real feather tree is the branches are far apart and you can see your ornaments very well. To me a feather tree says years gone by and the look fits into my prim living room. When I make my snowmen and Santas I like to give them a little feather tree to hold.  Making a real one can be very time consuming. So here is a little “kind of” feather tree to make that is so quick and easy. You can make them to have your dolls hold or make a bunch of them and put them in a stand and have a shelf or mantel display.
Step 1 – You will need to choose a center stick for your tree. I just cut a twig the size I want my tree to be. You will also need the branches part. For this is use Home for the Holidays Pine Stems. I got them on ebay from the seller 1804 primitives. I am sure you can get them at your local craft shop too.  These have a wire running through them and will bend a keep whatever shape you want and you can cut them with just scissors.

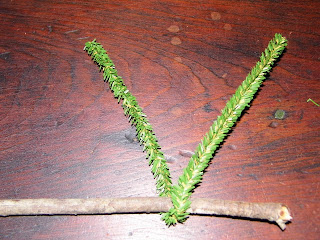
Step 2 – Starting from the bottom of the twig, wrap your branch once around the center twig. Make sure you put a dab of glue on the twig and then wrap so it will stay in place. I use Aleene’s tacky glue in the gold bottle.  The bottom branch will be the longest. S you go up the tree and add branches they will be smaller and smaller, the smallest being right at the top. Snip your branch so they are even. Let the glue dry.
Step 3 – Now you are ready to embellish your tree if you want. You can glue a little red berry at the end if you want or you can put rusty stars or bells on the ends of the branches. You can also tie a tiny piece of homespun or cheese cloth at the very end of the branch.  The little berries I used I got from my yard and I dried them. It is all up to you what you choose.
Step 4 – Now your tree is done. You can place it in the arms of a doll or you can put it in some kind of base, again it is what you want it to look like. They look great with an old wooden spool as a base. Just stick the twig into the hole in the spool and instant base. Wrap a little fabric around the spool and it looks even better. I would show you a picture of this but I have no idea what I did with my wooden spools. Sorry.
It is really that easy. The longest part is letting the glue dry. The rest takes only a few minutes.
If you have any questions please give me a shout. Enjoy, Faith