Friday, October 22, 2010

Trash to Treasure --- Repurposed Drawers

Have you ever had a piece of furniture that wasn't worth salvaging but the drawers were still good?     I did recently which led me to look for some ideas to use that drawer for another purpose.

This cute dollhouse was made from two nightstand drawers.  Tutorial on   Nice Girl Notes.


Can  you tell this shelf started life as a drawer?   Trash2Treasure tells you how.


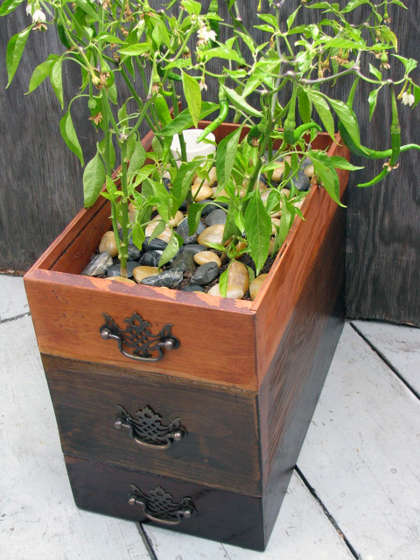
This takes a bit of work to put together but it sure is unique.   Instructions for making this self-watering planter from 3 dresser drawers can be found on Instructables.com


This is what I am going to do with my drawer.   Make a pullout underbed storage drawer.   I don't remember where I saw this one but do know that they added castors to the bottom and a cover over the top of the drawer.   The cover was tacked down on one side and the other side has a strip of velcro glued on for easy opening of the cover.


And if you don't have any excess drawers you can make your own underbed drawers from scratch.  BHG tells you how.


Thanks for visiting today.
Bette

Thursday, October 21, 2010

Today's Featured Artist - Pretty Handy Girl

Today's featured artist is Brittany (aka Pretty Handy Girl.

Along with being a graphic/web design artist, wife and mother of two, Brittany is an extraordinary do it yourself artist who would love to empower you to tackle your own diy projects.


How did you decide to start blogging?

I actually wanted to host classes in our garage to help people learn how to use power tools and create or fix things. My husband and best friend suggested that I could reach and empower more people with a blog, and thus PrettyHandyGirl.com was born.

When did you begin creating your own DIY projects?

 My parents added on to our house when I was young. There were always scrap pieces of lumber lying around. I dreamed of building my own playhouse in the back yard with that wood. I used to paint and color on those scraps (and still have two of them today!)

 When my husband and I moved to Philadephia, we bought some unfinished furniture from IKEA, I successfully stained them (although we kept smelling gas and finally ended up calling the gas company only to find out that using an oil based stain in an unventilated area is not a good idea! After that I recovered a hand-me-down couch by taking it apart and seeing how it was pieced together.

Did you have any formal training?

Definitely not, but I wish!

How did you learn how to create your own projects?

 My father had 3 daughters and no sons, so he taught us how to use his power tools, change the oil on our cars and wire an outlet (among other things.) My mom was always finding yard sale and curbside treasures. I remember her painting a bed, nightstand and dresser so they would coordinate for my bedroom. And she also re-upholstered a curbside chair for my college apartment. I always pay attention when someone is fixing, building or creating something.

  Was anyone inspirational in giving you the confidence to try a DIY project?

Definitely my father for teaching us we could do anything a boy could do (if not better!) And my mother for being a hands on type of woman who was not afraid to climb a ladder to paint something or figure out how to make something herself.


Where do you get your inspirations?

 Magazines, Flea Markets, Boutiques and definitely all the other wonderful blogs out there (including this one.)


Any advice you have to other new DIYers?

Look at how things are made. Don’t be afraid to ask for help. I find Lowe’s Home Improvement and Ace employees to be super helpful! The next time you have a handyman come fix something, watch how he or she fixes it and ask questions. Google how to instructions or videos. Most of all, just try it!


You can find the tutorials for all these and many more wonderful projects of Brittany's on her blog,   www.PrettyHandyGirl.com

Wednesday, October 20, 2010

Handmade Spotlight - Get Ready for the Holidays

Get Ready...

The OFG etsy team is having a Winter Holiday Celebration. Find everything you need to get ready for the Holidays. You can also find more items listed in our celebration, simply search for 'WHCOFG'. Below is a small sample of what the team has to offer.


$11.99

$6.50

$19.00

$13.99

$29.95

$4.00

$14.99

$37.00

$34.99

$5.00

$20.00

$15.00

$19.00

$9.99

$6.00


Generated using Treasury HTML code generator by Whale Shark Websites.


Click on the image below to view all of the items listed in the Winter Holiday Celebration.


Thanks for joining us today! 

Deena Davis, www.byyourhands.blogspot.com

Tuesday, October 19, 2010

Tuesday Tutorial --- China Painting

Out guest artist today is Joann Wheeler from Painted Panache.

A Work In Progress --- China Painting

                                     Inspiration Piece

So people always ask me how I do this. This time I took some pictures at each stage. Each piece of china is painted and fired in a kiln to a temperature of 1800 degrees multiple times. Here's some pictures of how it progresses:
                                       Blank China
The paints used are powdered paint pigments, mixed with oil for a painting medium.  Some people buy special mixtures of oils, however, you can use anything from mineral oil to motor oil!

Brushes used are very soft.  Unlike other types of painting very little paint is loaded on the brush. Your brush "kisses" the porcelain as you paint.
                                         
                              Design Sketched In

Each piece is painted multiple times as you build up your color from light to dark. There is no white on the palette, the white seen is actually the porcelain showing through. At each firing the glaze opens up and the paint goes into the glaze. As it cools the glaze closes and the paints become permanent. They will never wash off. They are dishwasher & microwave safe.

                                       The First Painting and Firing
The only exception to this is if the porcelain artist uses gold or lusters on the piece. Gold is actually 24kt. liquid gold. When fired it doesn't go into the glaze. It sits on top of the glaze.

                               Second Painting and Firing

Lusters like mother of pearl also sit on the top of the glaze. For that reason should you have gold or lusters, handwashing is advised.  Gold should never be put into the microwave as it is a metal and might give you a fireworks show!

                            Third Painting and Firing

So, if you are interested in porcelain art (a gift to treasure for generations to come), please visit the porcelain section of my Etsy shop:
http://www.etsy.com/shop/JYWheeler?section_id=5051128

Monday, October 18, 2010

Getting Organized - Craft Room Organization Video

I ran across this video and thought I'd share. She has some really neat ideas.