
Today we have a guest poster, Anna Garner from Polly Ceramica. Anna is giving you a tour of her studio and a little look into working with clay. Thanks, Anna!
Polly Ceramica Studio Equipment! ! ! !
by Anna Garner
Though my name is Anna, I have a fantasy identity as Polly Ceramica, who has a crafts
room full of balls of polymer clay in many colors, lots of workspace prepared for different
steps in the process of making pendants, beads and other kinds of ornamentation in the
beautiful medium of art clay. That crafts room is where I go -- as Polly Ceramica, of
course -- to engage in clay play.
Here is some of the equipment. First of all, Polly Ceramica insists on a smooth heavy
slab where she (I) can roll the clay with a rod before feeding it through a pasta machine
to make the surface smooth and the thickness uniform. Here is one of the boards I like
to work on, but I find that my clay cutters do leave shallow marks on it. I will probably
discard it soon for a thick plate glass work board. Here is a photo of the workspace
with some conditioned clay waiting to be rolled, cut, baked, sanded, waxed and buffed.
You will notice tools such as blades, brushes, texture plates, acrylic rods for rolling the
clay and a 10 inch square piece of clear acrylic for rolling logs of clay so that they are
even along the whole length.
The photo below shows another area that I often use since it has a harder and
smoother surface, but the board is dark and I find it less easy to see the cut edges of
some colors of clay. This is the darker board that usually has its place near the
machine roller for the flat pieces of clay as you see in the photo below.
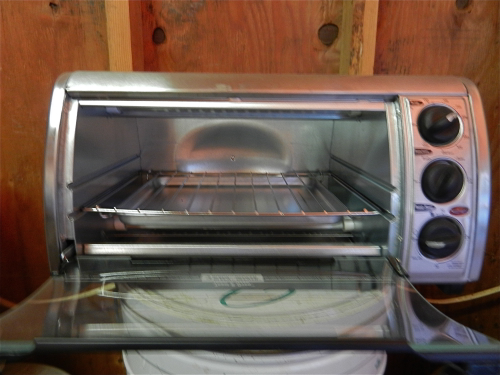
When I have some pieces cut, shaped and pierced, they are ready for baking. So I lay
my reliable mercury thermometer near the front of the glass window of the oven,
preheat the oven for half an hour, and then put the pieces into the oven for an hour,
timed with my reliable digital timer with an insistent alarm on it. Here is the small oven
that I use in the crafts room.
After I remove my Polly Ceramica creations from the oven and allow them to cool, I sort
out the beads and small pendants that need some smoothing and put them with smooth
riverbank pebbles into the electric rock tumbler and allow them to roll around with the
pebbles for a few to several hours.
They will still need sanding, buffing and waxing and buffing again, which I do with my
most valuable and adaptable tools -- my hands.
Thank you for reading my post. You are welcome to visit my studio at
http://CraftsofthePast.artfire.com.
There you may find listings of Polly’s ceramics, but I don’t
list many of my art clay creations for sale yet. I am busy working on some unusual
designs for a special kind of ornamentation: the inro or reliquary that can be worn as a
pendant necklace or as an accessory on a belt. I also will be making, or at least
attempting to make, some polymer encrusted linen diary or journal covers in the
upcoming weeks. Whether or not I have anything listed for sale, I thought you might
like to take this blog journey with me, so I wrote this journal entry as a post on
ByYourHands.
Thursday, August 1, 2013
Wednesday, July 31, 2013
Tuesday, July 30, 2013
Trash to Treasure -- Storage
Today I thought I would share some trash to treasure storage units I came across. Just click on the blog names to go to the tutorials.
This is shelving made from old shutters from Follow Your Heart Woodworking. This would look great in any room.
Here is a trunk made over into end-of-bed storage from The Vintage Magi:
Old bookshelf made into nifty storage by Remodel Aholic.
I don't know where this one came from but I really like the look of it. It is made from two old windows and two dresser drawers.
Thanks for visiting today.
Bette
This is shelving made from old shutters from Follow Your Heart Woodworking. This would look great in any room.
Here is a trunk made over into end-of-bed storage from The Vintage Magi:
Old bookshelf made into nifty storage by Remodel Aholic.
I don't know where this one came from but I really like the look of it. It is made from two old windows and two dresser drawers.
Thanks for visiting today.
Bette
Monday, July 29, 2013
Jacquie's Up-Cycle Nation: Beachy Bunting
Today's bunting idea sprang to life as I was moving office clutter to the trash bins in the garage.
These old CD's and DVD's have been clogging up my office drawers and glove compartment for years! I finally threw this shiny stack in the recycle bucket this morning. Good riddens!
But as I headed out of the garage, past the charity donation pile, the summery blues of my husband's cast off dress shirts caught my eye! Suddenly, visions of pin stripe buntings danced into my head!
I would need those CDs after all!
With a few additional sewing supplies, I was ready to roll out some bunting!
Each CD will need 3 strips of fabric approximately 1.5-2 inches wide by at least 12-18 inches long. The longer the strip the better, but when using scraps cut from garments getting consistent lengths can be difficult. I used the ripping method (cut a small start line and rip fabric instead of cutting entire strip with scissors). This leaves a soft, natural edge on the fabric.
Insert a strip through the CD's center hole. Use a finger to hold down end of starter ribbon and begin wrapping fabric strip around top of CD and back through center hole.
Continue wrapping in a counter-clockwise direction, overlapping the previous layer each time. As the fabric thickens in the center, use the pointy end of skinny paintbrush to assist in poking fabric through the center.
Tuck the strip end under the previous layer, using the paintbrush handle to secure in place. Start the next strip on top of the on top of the previous end. Wrap over tucked layer for extra coverage.
Once the CD has been covered in fabric, use a needle and thread to attach button centers. Start with a stitch to hold the last tuck in place at center.
With chosen button in center , stitch the button to the CD with stitches that go through to reverse side of the hole.
On reverse side, secure a second button over center to hide stitches. Secure to button on front by stitching through CD center hole, through front button holes, and through back button holes. Essentially sewing button to button like a CD sandwich. Continue until both buttons are secure.
Once all the CDs are finished they are ready to be attached to the twine.
Using a loop stitch, attach the CD to the twine. Reinforce loop by stitching at least three repeat loops on each CD.
From the stitched location on the twine measure out 10 inches and attach the next CD. Continue doing this until all the CDs have been attached.
Now your office drawers are freed up, those corporate power stripes have been softened up, and your fab new bunting is ready for showing off!
LOVE & UP-CYCLE NATION!!
Jacquie Wheeler
Hand of Bela Peck
Labels:
budget decorating,
bunting,
by your hands,
handmade,
pinstripes,
recycle CD,
summer crafts,
trash to treasure,
up-cycle,
up-cycle nation,
vintage buttons
Sunday, July 28, 2013
Blog Party Sunday --- Show Us Your Handmades
Welcome to our Blog Party Sunday. We would love to have you show us what you are crafting.
You are allowed to add 3 links to your shops or your blog.
The rules are simple:
1. Follow our blog
2. Handmade items only.
3. You may list up to 3 items each week.
4. Family friendly items only.
The success of this link party depends on the participants so spread the word to your friends, visit the shops, post about it on your blog, in a forum or on your favorite social networking site, grab the button and put it on your blog or website.
Just click on the Add Your Link button below and add your items.
And if you would like to add a link to the party you can grab this button below.

You are allowed to add 3 links to your shops or your blog.
The rules are simple:
1. Follow our blog
2. Handmade items only.
3. You may list up to 3 items each week.
4. Family friendly items only.
The success of this link party depends on the participants so spread the word to your friends, visit the shops, post about it on your blog, in a forum or on your favorite social networking site, grab the button and put it on your blog or website.
Just click on the Add Your Link button below and add your items.
And if you would like to add a link to the party you can grab this button below.

Subscribe to:
Posts (Atom)


.jpg)



