Today's featured shop is Quinnys Crochet. Carol makes crocheted baby clothes, blankets and accessories, ladies scarfs and anything else that takes her fancy.
Here are some adorable outfits for your favorite baby girl.
Baby girl jacket, hat and booties set hand crocheted red with white trim christmas outfit
Baby girl christmas headband white band with red heart with white trim and red rose
Baby girl christmas dress green with white sleeves and edging with red rose and ribbon trim hand crocheted in a soft acrylic yarn
Handmade baby girl preemie jacket hat booties and blanket pink and white crochet layette set
Be sure and visit Carol's shop to see all her handmade crocheted items. https://www.etsy.com/shop/QUINNYSCROCHET
Friday, November 15, 2013
Today's Featured Shop -- Quinnys Crochet
Wednesday, November 13, 2013
Witches Stiches – Rosettes
The holiday season is right around the corner. When it comes to gift giving I have always kept
it simple and homemade. When my children were little they would help me make
cookies and homemade breads. We would put together gift baskets filled with homemade
delights from the kitchen and the craft room. Every year we had a huge Christmas party at
our house. The house was decorated and filled with friends and family. When it
came to gift giving time we would all exchange gifts. We were all like- minded
so the gifts were all homemade and vintage yard sale finds. I guess my point is
that gifts from your hands are always best.
I will show you how I made a shabby chic tag, (I know I did
tags on here before), it is not so much the tag but the rosettes I put on them.
You can make simple fabric rosettes add them to objects and they make great
gifts. Tae the tag I will show you add it to a bottle of wine for a hostess
gift, you can also use them as jacket pins. I have made lots of them in the
past, and given them away. I also made shabby chick hanging sap buckets they
were super easy.
Anyway here is how to make the little simple rosette that
you can add to anything to give it a special touch.
Step 1 – Cut your fabric strip. Now this all depends on what
size rosette you need for your project. The ones here are 1” X 22”. After I cut
that size out I then cut the strip into 4 equal lengths. So now you have 4 pieces
of fabric. If you want to make larger rosettes you will increase the size of
your fabric strip.
Step 3 – Thread your needle with heavy duty thread. (Carpet
and button thread works great for this). If you use regular sewing thread, you
run the risk of your thread snapping when you gather the fabric strip. Knot one
end of your thread and use a running stitch down the length of the fabric strip.
When you get to the end of the strip pull your thread tight and the fabric
strip will gather. Bring the two ends together in a tight circle and tack them
together wand then not off your thread and clip. You now have a tiny fabric
rosette.
Step 3 – Pick a center for your flower. You can use a button
a rhinestone anything that you feel looks good. I used a metal brad. They were the perfect size. You can make another
a little larger and stack the two on top of each other for more dimensions.
Step 4 – Now for the tag. I used plain shipping tags. You
can buy these at craft stores in the scrap booking section, but you can also
buy them at Office Depot or Staples for half the money and they come in two
different sizes. I used Tim Holtz Distress ink and an ink pad. I have an ink
pad holder, but if you don’t want to get one you can use a makeup sponge. Take
your ink and lightly start from the edges in a circular motion and apply the
ink to the blank tag. Keep the outside edges darker and the inside part
lighter. Make sure you ink the back also, it makes it look neater.
Step 5 – Your tag is inked now all you have to do is add
your rosettes and any other embellishment you want. I added a piece of lace.
The lace was to white for what I wanted so I went over it with Tim Holtz
Distress Ink. I used white craft glue in
the gold bottle. That is it. You have a great tag to add to a gift.
Step
6 – Sap Buckets - You can find these in vintage and antique stores and they
make reproduction ones you can find in home décor stores. Paint the bucket any
color you want. I spray painted the black one and with flat black and the off
white one I just used acrylic craft paint. After they are dry you can embellish
any way you choose. I wrapped them with burlap, (I spray painted the burlap on
the black bucket with flat white paint). Then I added my rosettes. The ones on
the buckets have 3 and 2 tiers to them. I used a button for the center and glued
it on. Then I glued the rosette to the burlap and that was it. I love the look.
You can make a gift of a jar candle into something special
by wrapping the jar with fabric, just big enough to cover the label. Then tack
it on with a bit of glue. Make a contrasting rosette and make a matching tag. Make
cookies, wrap in cling wrap, now wrap in a piece of fabric. Now add one of
these tags and it makes your cookies look like a work of art. The list goes on
and on.
These rosettes are so easy to make. The ones I made for the
shabby chic tags took me five min to make four, they add a homemade touch to
all your gift giving.
Gifts from your hands will always touch their hearts. That
is what it is all about. As always if you have any questions please give me a
shout. Enjoy, Faith
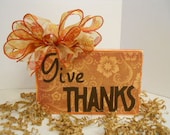
Handmade Spotlight - Giving Thanks
Sponsored by send bulk email from excel.
Labels:
etsy treasury,
handmade,
handmadespotlight,
Spotlight,
thanks,
Thanksgiving
Tuesday, November 12, 2013
Needles-n-Pins Stitcheries: Sugar Dispenser Turned String Dispenser
I follow the great blog Sew Many Ways and Karen over there has some of the greatest ideas on re-purposing, up cycling, decorating and much more. I thought I would start bringing some of her ideas to our blog right here! :)
This one is about up cycling an old sugar dispenser into a string dispenser. You can turn it into a sewing kit also as seen on her blog, but I am going to show you how she made the string dispenser since I have more thread than I know what to do with.
Now some of you might not be old enough to remember these old dispensers (maybe they still have them...I don't know), but I am sure a lot of you remember them like I do. :)
Pictures from Sew Many Ways
Put your thread in the dispenser
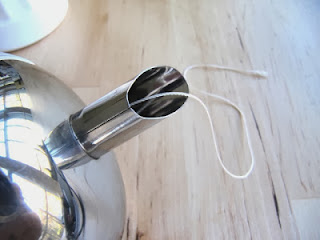
Pull the thread through the spout and presto......you have a really neat thread dispenser. I thought this was such a neat idea!
You can also use it for a string dispenser. Always have your string available and where you need it.
Karen also shows you how to turn the dispenser into a sewing kit with pin cushion and scissors!
I thought this was such a good idea that I wanted to share it with you. Now....if I can only find an old sugar dispenser.....off to the thrift shop to search!!
I want to thank Karen at Sew Many Ways blog for showing me how to make this cute thread dispenser.
Colleen :)
Labels:
byyourhands,
needlesnpins,
sewing tutorial,
sugar dispenser,
tutorial,
up cycle
Monday, November 11, 2013
Jacquie's Up- Cycle Nation: Baggage
We've all got baggage- Why not make the best of it!
This simple up-cycle makes use of all those random scraps, souvenirs, paint, and everything else in the stash closet. It also creates a new attractive space to stash more stuff!
The only true essentials for this project are Mod-podge, a good paintbrush, and patience.
Choose a suitcase that is made of hard plastic. These vintage cast-offs are in abundance at thrift stores. This dud cost $5.99 at Salvation Army. A bargain for me and the money goes to a good cause: a win-win up-cycle!
Use old book pages or scrap paper to create the first layer. Mod-podge directly to suitcase. This takes a lot of Mod-podge and I found a large household paintbrush to be the best tool for the job. Use small paper strips along skinny areas and rounded corners. Leave some areas bare as these smaller spots can be covered with paint.
If papers bubble or come loose, simply pull them off and cover with new paper.
Let mod-podged paper layer dry over night.
Use acrylic paint to brush over paper and bare areas of the suitcase.
Now begin adding a new layer of visual interest. Using a bottle cap as a stamp, I made loose polka dots in the lower corner. Get creative with old stamps, freehand drawing, or markers.
Adding layers becomes addictive!
The suitcase becomes a great place to display accumulated stickers and snippets hidden away in idea folders.
Smaller tidbits get their own special place on the suitcase sides.
Washi tape looks smart along the structured lines of the suitcase.
To protect layers as the design builds, spray suitcase with a clear coat.
There is no real end to the suitcase I am working on. Though it is done "for now", I have a feeling there are many more layers to come.
LOVE & UP-CYCLE NATION!!
Jacquie Wheeler
Hand of Bela Peck
Labels:
collage,
handmade,
mod-podge,
old suitcase,
scrapbook paper,
shabby chic,
up-cycle,
up-cycle nation,
vintage books,
washi tape
Subscribe to:
Posts (Atom)


