Saturday, October 26, 2013

It's Giveaway Time -- Win Free Advertising For Your Handmade Shop

Welcome to another giveaway.   Today we are giving away a six month listing on our new website,   Handmade Artisan Connection, to anyone with a handmade shop.


You can earn up to three entries by doing the following...

1. Earn one entry just for leaving a comment.  Be sure and leave your email address so we can contact you if you win.

2. Earn one extra entry by becoming a follower of this blog thru Google Friend Connect or Linky Followers.. Already a follower? Just let us know so we can give you credit.

3. Earn an extra entry by sharing the link to this giveaway on your Blog, Facebook, Pinterest or Twitter. Be sure and let us know you have done this and where.

The giveaway will start today, Saturday, October 26. The last day to enter will be November 15, 2013 and the winner will be announced on November 16, 2013. We will announce it here and contact you by the email address you have left. 

Have fun and good luck!

The Handmade Artisan Connection is your connection to the artisans who make and sell their own products, many of them one-of-a-kind.

Support handmade by shopping for unique goods directly from the artisan who creates with love, care and attention to detail.

If you sell your own handmade wares,  you'll want to be listed on Handmade Artisan Connection! 
Click Here to get listed on Handmade Artisan Connection Online Catalog today! 

If you're looking for one-of-a kind Handmade products, you'll want to stop by often! 

Join our mailing list so you can receive updates when we have a new artisan listing or new products have been added to our artisan's shops.
We mail our newsletters out twice a month on the 1st and 15th.
We never share your email address.


 Subscribe to our mailing list * indicates required


Email Format


Would you like to sponsor a giveaway? Are you interested in promoting your store or blog. If so, just email us.
We would be happy to send you the details. byyourhandsblog@gmail.com

Friday, October 25, 2013

Today's Featured Shop -- Snowman Collector

Today's featured shop is the Snowman Collector.     Snowman aren't only for Christmas.   There are a lot of snowmen collectors out there and Sheila specializes in making snowmen all year round.

Snowmen Bloom in Winter Centerpiece


Large Snowman Will Work For Snow


Cheerful Snowman Spring Nodder

Merry Christmas Little Fabric Snowman

Be sure and visit Sheila's shop to see all she has to offer.    https://www.etsy.com/shop/SnowmanCollector

Thursday, October 24, 2013

Witch’s Stitches – Making a “kind of” Feather Tree

I love feather trees. I have one I put up every year that stands 6 feet tall. My kids call it the Christmas stick. The nice thing about a real feather tree is the branches are far apart and you can see your ornaments very well. To me a feather tree says years gone by and the look fits into my prim living room. When I make my snowmen and Santas I like to give them a little feather tree to hold.  Making a real one can be very time consuming. So here is a little “kind of” feather tree to make that is so quick and easy. You can make them to have your dolls hold or make a bunch of them and put them in a stand and have a shelf or mantel display.
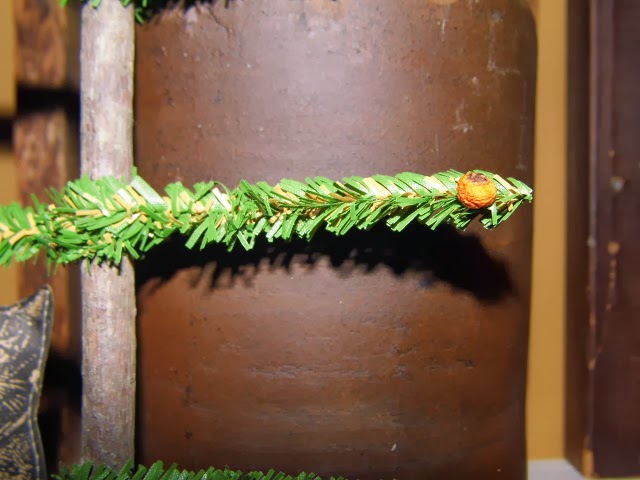
Step 1 – You will need to choose a center stick for your tree. I just cut a twig the size I want my tree to be. You will also need the branches part. For this is use Home for the Holidays Pine Stems. I got them on ebay from the seller 1804 primitives. I am sure you can get them at your local craft shop too.  These have a wire running through them and will bend a keep whatever shape you want and you can cut them with just scissors.

Step 2 – Starting from the bottom of the twig, wrap your branch once around the center twig. Make sure you put a dab of glue on the twig and then wrap so it will stay in place. I use Aleene’s tacky glue in the gold bottle.  The bottom branch will be the longest. S you go up the tree and add branches they will be smaller and smaller, the smallest being right at the top. Snip your branch so they are even. Let the glue dry.
Step 3 – Now you are ready to embellish your tree if you want. You can glue a little red berry at the end if you want or you can put rusty stars or bells on the ends of the branches. You can also tie a tiny piece of homespun or cheese cloth at the very end of the branch.  The little berries I used I got from my yard and I dried them. It is all up to you what you choose.
Step 4 – Now your tree is done. You can place it in the arms of a doll or you can put it in some kind of base, again it is what you want it to look like. They look great with an old wooden spool as a base. Just stick the twig into the hole in the spool and instant base. Wrap a little fabric around the spool and it looks even better. I would show you a picture of this but I have no idea what I did with my wooden spools. Sorry.
It is really that easy. The longest part is letting the glue dry. The rest takes only a few minutes.
If you have any questions please give me a shout. Enjoy, Faith

Tuesday, October 22, 2013

Paper Purse Craft Tutorial


I absolutely love this paper crafting tutorial for Living Locurto. I'm thinking it would be really cute done with Halloween themed paper and embellishments. Enjoy!


Deena Davis
www.byyourhands.com