Sunday, May 12, 2013

Blog Party Sunday - Share Your Handmades

Welcome to our Blog Party Sunday. We would love to have you show us what you are crafting.

You are allowed to add 3 links to your shops or your blog.

The rules are simple:
1. Follow our blog
2. Handmade items only.
3. You may list up to 3 items.
4. Family friendly items only.

The success of this link party depends on the participants so spread the word to your friends, visit the shops,  post about it on your  blog, in a forum or on your favorite social networking site, grab the button and put it on your blog or website.
Just click on the Add Your Link button below and add your items.
And if you would like to add a link to the party you can grab this button below.


Friday, May 10, 2013

Today's Featured Shop -- Pumpkin Patch

Today's featured shop is Pumpkin Patch.   Loretta is a wonderful artist who works in a variety of techniques.   Some items are painted on unique surfaces and are one of a kind.

Gingerbread Man cherry Cupcake Left Orig. Fridge Magnet Ornament


Little Girl at the Beach Colored Pencil


White Artic Wolf Colored Pencil


White Wine Glasses Seaside Watercolor


Be sure and visit Loretta's shop to see all her beautiful artwork.  http://www.etsy.com/shop/pumpkinpatch5

Tuesday, May 7, 2013

Tuesday Tutorial -- Burlap Rose Pin

Today I am showing you how to make a Burlap Rose.   Burlap is very messy and because it is a woven material it falls apart on the edges.   I like my roses neat so here is my version.


Supplies

Piece of burlap,  25 inches long (or desired length) x 3 1/2 inches wide
Craft Bond glue or Fabric Hot Glue
Small piece of matching felt
Metal Pin Back
Matching thread


Iron your piece of burlap in half.   

Fold the ends back and stitch them with a short zig zag stitch. Turn them right side out.

Stitch down the length of the burlap with a small zig zag stitch, 3/4 of an inch in from the edge.
Stitch another row of stitching right next to the first one.

 Trim the excess fabric away from the outer edge.

 Now with a straight stitch,  stitch about one inch from the edge and then pinch about 3/4 of an inch of fabric folding it under to make a pleat.

 Continue to fold the pleats and stitching across them to the end of the fabric.

 Your finish piece will look like this.

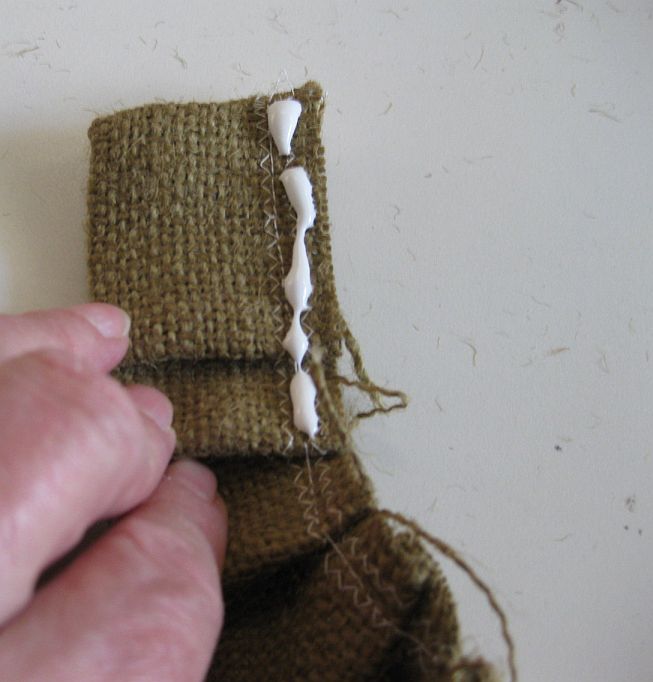
 Now with your craft bond glue or if you prefer you can use fabric hot glue sticks, start putting a line of glue along the edge.  ( I prefer the craft glue because hot glue has a tendency to melt in hot weather.)

Start rolling the fabric from the end.

Continue glueing and rolling to the end of the fabric.


If you used craft glue,  pin the end of the rose so it stays together while it dries, several hours or over night.   If you used hot glue,  you can go to the next step right away.


Here is the finished rose.   You can determine the size of the rose by using a longer or shorter length of burlap.


Cut a circle of felt the size of the bottom of the rose.  Glue or stitch the pin back to the felt.


Glue or whip stitch the felt to the bottom of the rose.


Your rose is done.  Use it on a pillow, purse or on your lapel.


Hope you enjoyed today's tutorial.

Thanks for visiting today.

Bette

http://www.bettestomorrowstreasures.com
http://www.handmadebybette.com

Monday, May 6, 2013

Jacquie's Up-Cycle Nation: Give 'Em The Slip

Last year's chair cushions showing their wear?  Don't throw them away!  Give them a quick, easy-peasey facelift with slip covers made from an old button-down shirt.
Spring has sprung across the country and as we dust off our front porches, entryways and fave outside spaces we realize Ewwwwwwww- the winter has taken a toll on those seat cushions!
  I always cringe at the thought of spending money on generic over-priced cushion covers!  Everything needed to spruce up this seat is already at home.
What You Need:
Old cushion
Sharpie Marker
Old button down shirt (or a button front full skirt works well too)
Cotton or poly batting

With shirt buttoned, turn shirt inside out, lay flat. 
The button side of the shirt will be the slip cover bottom.
Place the cushion on top to use as pattern.
 With Sharpie marker, trace the cushion's shape Remember to add extra room (usually and additional 1-2 inches) to allow for the cushion depth.
Cut 1 layer of batting the same size as the fabric, place against wrong side of top layer.
Pin all three layers together.  Stitch 1/2 inch along the outer edges.  Reinforce with a zigzag stitch.
Unbutton all buttons and turn slip cover right side out.  Press. 
At this point, embellishments can be added such as simple knots, buttons, or decorative hand stitching. 
 Place old pillow inside new cover.
Re-button bottom side, place on chair, and enjoy!
Rut-roh- Now the rest of that corner needs a face lift!
LOVE  &  UP-CYCLE NATION
Jacquie Wheeler
Hand of Bela Peck