Sunday, April 28, 2013

Blog Party Sunday - Share Your Handmades

Welcome to our Blog Party Sunday. We would love to have you show us what you are crafting.

You are allowed to add 3 links to your shops or your blog.

The rules are simple:
1. Follow our blog
2. Handmade items only.
3. You may list up to 3 items.
4. Family friendly items only.

The success of this link party depends on the participants so spread the word to your friends, visit the shops,  post about it on your  blog, in a forum or on your favorite social networking site, grab the button and put it on your blog or website.
Just click on the Add Your Link button below and add your items.
And if you would like to add a link to the party you can grab this button below.


Saturday, April 27, 2013

Recipe of the Week - Green Tea With Citrus

I realize a lot of you probably drink iced tea all year long, but for some reason, for me, it only tastes good when it's warm outside.

Although I like just regular tea with no sugar, my favorite tea store-bought tea is Lipton Diet Green Tea with Citrus. It's somewhat expensive (in my opinion) so I don't buy it very often. However, I might be having it more often now after finding this recipe.

This is one of those copycat recipes and it comes from www.topsecretrecipes.com You'll have to visit the link for the full recipe, but this is what the recipe calls for...

Boiling Water
Green Tea Bags
Equal Sweetener
True Lime
Orange Extract


What's your favorite way to drink tea? Hot cold? Sweetened, unsweetened? Do you have any great tea recipes? Leave us a comment... we'd love to hear from you.

Thanks for joining us today,
Deena Davis
www.byyourhands.com

Friday, April 26, 2013

Today's Featured Shop -- Hand of Bela Peck

Today's featured shop is Hand of Bela Peck.    Jacquie loves to use upcycled materials in her work.

She is also a new writer on our blog.
You can find her column "Up-cycle Nation" on Mondays where she will be teaching you how to work with found materials.  

As you can see from the sampling of Jacquie's work below,  she makes some wonderful one of a kind designs with her upcycled materials.

Primitive Sheep Prim Lamb Wool Sheep


Fish Decoy Primitive Fish on Driftwood


Primitive Skeleton Doll


Primitive Snowman Christmas Ice Skating


 Be sure and visit Jacquie's shop to see all her handmades and check out her column right here on Mondays. 
http://www.etsy.com/shop/Handofbelapeck

Thursday, April 25, 2013

The Witches Stitches -- Doll making 101


Cutting Fabric and Sewing
You have decided that you want to make a doll or two. The best way to start is to find a pattern you like. There are many to be found online www.etsy.com  they have a large selection. You can always make your own pattern, but as a beginner you may want to purchase one that appeals to you. Read all instructions for your pattern before you start your doll.

One of the best ways to sew and cut your pattern out is to trace your pattern onto white freezer paper.  You can purchase this at any grocery store. After you trace all the pieces onto freezer paper cut them out. Place the pieces on your fabric making sure you leave space between each piece so you have room sew around it, about an inch. Set your iron to whatever setting is right for the fabric you are using.  Iron the freezer paper pattern pieces onto your fabric SHINY side down, cut around each piece making sure you have left your seam allowance around each one. Sew around each piece making sure all your stitches are straight. Take your time sewing around the corners.  Make sure you leave the openings when the pattern indicates so you can turn your pieces to the right side.  


After you have sewn around all your pieces, trim and remove the paper from your fabric. Just lift from the edge and pull. Save the paper pieces, you can use them over and over again until the shiny side no longer sticks. You can get as many as 6 dolls from the same pieces.
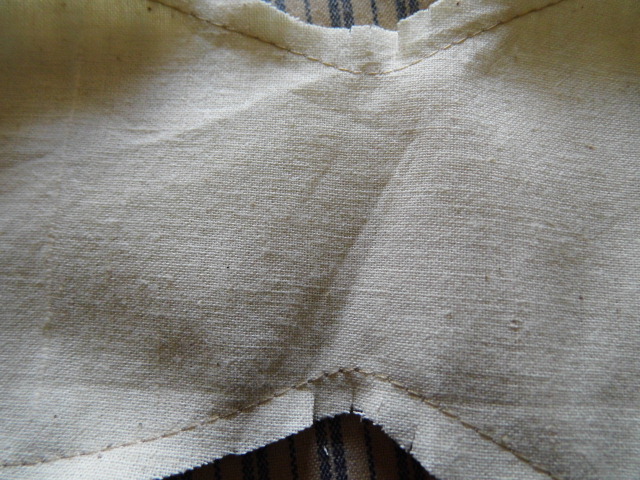
Cut around the pieces closer making sure you leave an even seam allowance around each piece. After they are all cut out you will have to clip any curves or section with indentations with small slits. This will allow your piece to lay flat after you have turned it to the right side.


Now you are ready to stuff your doll.


How to make smooth seams on your dolls

Ever make a doll and it has bumps all around the seams? Well there are 2 ways you can make sure that does not happen and your dolls have smooth professional look.
Wrinkle free seams start with making sure your stitches are all straight and none of them are out of line. One stitch out of line and there will be a small lump in the seam. After you have finished sewing your seems check them to see if any stiches are out of line. If they are just go over that part of your seem.
Begin to stuff your doll with small pieces of whatever you have chosen to use. You will have to make sure you stuff the pieces tight to make sure you have a smooth seam line.  This way you build a lot of small layers instead of trying to stuff with large pieces. Using small pieces will take a little longer, but the smooth finished look you get is so worth the time.
A great tool to use is called a stuffing fork, you can place stuffing  in the smallest area. You can find one at www.etsy.com just put the words stuffing fork in the search and you will find several.
The Key in using a stuffing fork is to let the teeth on the end of the fork grab the stuffing and then twist it a bit. This keeps the stuffing on the fork while you guide it into place.
After you have finished stuffing your doll check all the seams. If you see any lumps take a very small piece of stuffing and use your stuffing fork to place the stuffing where it is needed.  If no more stuffing is needed, use your stuffing fork and slightly rearrange the stuffing already there. This will give you smooth professional looking seams.
If you have any questions feel free to contact me and happy doll making!