




Congratulations Cheri (Country Cottage) from Ohio on winning the clothespin dress giveaway.
The winner was picked using the true generator on Random.org. We want to thank all of you who took the time to enter and for all the wonderful comments.
Be sure and come back again tomorrow as we will have a new giveaway starting.
Friday, May 7, 2010

Thursday, May 6, 2010
Today's Featured Artist - Motherload Toad Factory
Today's featured artist is Robyn Martin of Motherload Toad Factory
I have owned two Gift Stores, taught an children's extended learning class "Letting your Inner-Artist Out," and professionally painted several murals.
This is part of a 25'X8' wall:

This is me working on a mural in a local Country Club Restaurant, and faux painting their walls. I rarely paint murals now...ladders and I do not get along!


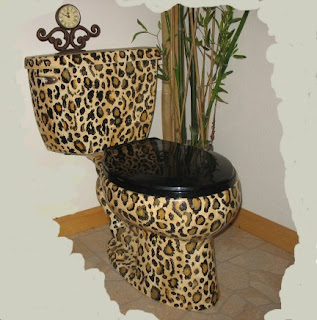
I have been known to paint on almost anything.......Yes, it's a potty!

AND the Crow Family Pineapple Luau


Do you have set hours to work?
www.motherlodetoad.etsy.com
www.toadsonghollow.etsy.com
www.patternmart.com
And also a boutique I help organize and run every year locally.
The Gold Dust Boutique at the Mace Meadow Golf and Country Club in Pioneer,CA-- Nov. 5th-6th
Some of Robyn's adorable animal patterns.

How long have you been in business?
Most of my life, which has been long and full. I have three grown children and eight beautiful grandchildren. Next year, I will have been married (YES! To the same patient man!) 50 Years!! I come from a long line of very eccentric, creative women, who are born blessed with the ability to create almost anything. Having no formal training I am not restricted to as to how to make things I just follow my own "inner-artist."I have owned two Gift Stores, taught an children's extended learning class "Letting your Inner-Artist Out," and professionally painted several murals.
This is part of a 25'X8' wall:

This is me working on a mural in a local Country Club Restaurant, and faux painting their walls. I rarely paint murals now...ladders and I do not get along!


I have been known to paint on almost anything.......Yes, it's a potty!

How did you get started?
I really got inspired in first grade when my teacher entered a finger painting of mine in the County Fair and it not only won first prize but was sold.
What is involved in making your craft?
Not much thought just a "glimmer" of an idea. Generally, I have several things in the process of being created. Because most of my creations require extensive drying time...I just move on to the next item...Unfortunately, I sometimes forget to get back to some of these things and they have to wait a while for completion. I draft the pattern, sew, sculpt and paint my soft-sculpture items. Some have an inner armature to allow them to stand. I now am fascinated with soft sculpture mainly crows and other birds, who knows what next week will bring? Several dolls have been waiting to get completed.
This is the latest: Malachite and Magenta Magpie

AND the Crow Family Pineapple Luau

What is your favorite thing to make?
My real love is paper mache. I have always loved this medium. I make my own paper mach pulp from scratch using my "secret formula." The largest project was a float for a local parade. I paper mached my husbands entire pick-up truck into a blue-eyed, giant green dinosaur...and then rode on top holding reins made of ribbon. The next year the truck became a covered wagon pulled by a giant Monarch Butterfly...the following year my husband sold his truck!! Now, I mainly create smaller, decorative items like pumpkins and pineapples but I am tempted whenever I see a pick-up truck!

Do you have set hours to work?
No! I am inclined to be a night-owl.....I do work? (what's that?) in my studio several hours every day.
What are your future plans for your business?
I rarely plan anything....wonderful things just happen!
What does handcrafting mean to you?
I am an Artist, always have been and always will be---handcrafting IS me!
Where do you sell your crafts at?
www.motherlodetoad.etsy.com
www.toadsonghollow.etsy.com
www.patternmart.com
And also a boutique I help organize and run every year locally.
The Gold Dust Boutique at the Mace Meadow Golf and Country Club in Pioneer,CA-- Nov. 5th-6th
Some of Robyn's adorable animal patterns.

Wednesday, May 5, 2010
Handmade Spotlight
Each Wednesday, we'll be spotlighting some items that are made"by your hands".
Today, we're featuring Handmade Candles. I wish I could take a sniff from every one of these.
 |  |
 |  |
 |  |
 |  |
 |  |
Tuesday, May 4, 2010
Let's Make a T-Shirt Pillow!
A few days ago, I spent the afternoon making a t-shirt pillow with my 4 year old son. He was actually quite impressed with the outcome and since I don't sew as much as I used to, he had lots of questions about the sewing machine and what pins were used for. LOL
These pillows can be made from any size t-shirt that's in good condition. We made two of these gems, and both were made from "too small" t-shirts that my boys loved. (What boy doesn't like camo?)
Here's how it's done...
Examine the shirt and make sure it is free of holes and/or stains.

Turn the shirt inside out and smooth out all wrinkles on a flat surface. Be sure to remove any tags that might get in the way.

Line up the sleeves and bottom hem and pin. You will be sewing these openings closed.


Sew across both sleeve openings and across the bottom. I used the stretch-stitch setting on my sewing machine since the fabric has some stretch to it.

Now that the sleeves and bottom are sewn, we need to make a "box seam". Take hold of one corner at the bottom. Line up the bottom seam you just made with the side seam. You will be forming a triangle with the fabric.

To make sure the seams are lined up, I always stick a pin thru the middle of each seam.

Smooth out the corner, remove the pin that you just put in the middle of the seams, pin and sew across the corner about an inch and a half away from the end point.
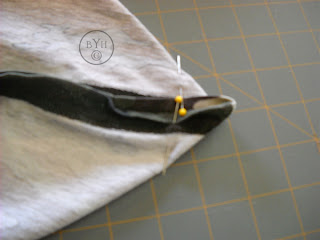

Trim off the excess leaving a 3/8 inch seam... or something close. Just don't trim it too close.

Do this on both sides of the bottom seam.
Now, turn the shirt right side out through the neck opening, making sure to push all the corners of the sleeves and bottom out.
Stuff the shirt with your favorite stuffing. I used polyester fiber stuffing. Be sure to fill it full to make a nice even pillow.

Now we'll pin the neck opening closed. This can be a little tricky if it's stuffed really full, but it's not hard to do. Take your time.

After pinning, I sewed the opening closed by hand with a blind hem stitch, but you could also whip stitch it closed.
The outcome should look something like this...

These pillows are fun to make from all sorts of t-shirts and they're really comfy too. You could use school themed t-shirts, shirts from a vacation, or perhaps something your children have outgrown.
Have fun with it!
Deena Davis
www.ByYourHands.com
These pillows can be made from any size t-shirt that's in good condition. We made two of these gems, and both were made from "too small" t-shirts that my boys loved. (What boy doesn't like camo?)
Here's how it's done...
Examine the shirt and make sure it is free of holes and/or stains.

Turn the shirt inside out and smooth out all wrinkles on a flat surface. Be sure to remove any tags that might get in the way.

Line up the sleeves and bottom hem and pin. You will be sewing these openings closed.


Sew across both sleeve openings and across the bottom. I used the stretch-stitch setting on my sewing machine since the fabric has some stretch to it.

Now that the sleeves and bottom are sewn, we need to make a "box seam". Take hold of one corner at the bottom. Line up the bottom seam you just made with the side seam. You will be forming a triangle with the fabric.

To make sure the seams are lined up, I always stick a pin thru the middle of each seam.

Smooth out the corner, remove the pin that you just put in the middle of the seams, pin and sew across the corner about an inch and a half away from the end point.

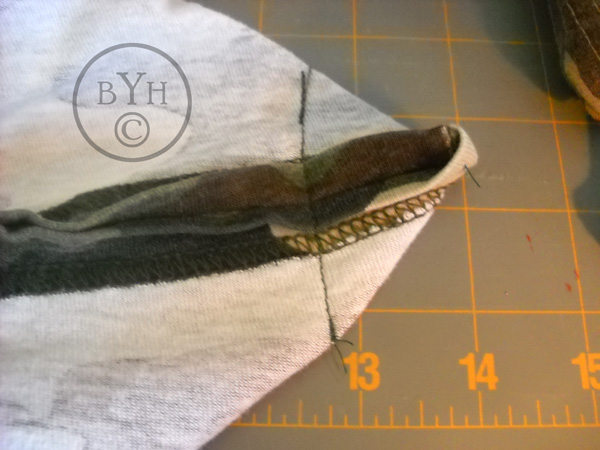
Trim off the excess leaving a 3/8 inch seam... or something close. Just don't trim it too close.

Do this on both sides of the bottom seam.
Now, turn the shirt right side out through the neck opening, making sure to push all the corners of the sleeves and bottom out.
Stuff the shirt with your favorite stuffing. I used polyester fiber stuffing. Be sure to fill it full to make a nice even pillow.

Now we'll pin the neck opening closed. This can be a little tricky if it's stuffed really full, but it's not hard to do. Take your time.

After pinning, I sewed the opening closed by hand with a blind hem stitch, but you could also whip stitch it closed.
The outcome should look something like this...

These pillows are fun to make from all sorts of t-shirts and they're really comfy too. You could use school themed t-shirts, shirts from a vacation, or perhaps something your children have outgrown.
Have fun with it!
Deena Davis
www.ByYourHands.com
Monday, May 3, 2010
Sewing Room Organization - Pegboard
Today's organizational post is about the variety of uses for pegboard in a craft/sewing room.
My sewing room is pretty small, only 8 ft. by 10 ft., so I have had to make use of every available space. This outside wall is block so very hard to attach anything to it.
I solved the problem of wasted space by putting a large piece of pegboard in this spot.
I painted it to match my wall paint, attached it to the wood at the top of the wall and then had to decide how best to use the space.
I added a shelf, hooked some covered baskets to the bottom and side and even found a spot for the basket holder that has been sitting on a table in my way for some time.

I decorated these baskets a long time ago so I don't know if they are still available but I will show some close up pictures of how they are put together.

For the fabric on the lid, just cut a piece of cardboard the size of the middle of the lid and cover it with batting and fabric and glue it to the lid. The front of the lid has 1/4 inch ribbon glued at the sides and then woven through to the middle and tied in a bow.

Weave 1/2 inch wide ribbon through the basket sides. And the lid is tied to the basket in the back with three pieces of ribbon left a little bit loose so the lid will open and close and tied in a knot. These baskets are just hooked over a couple of peghooks under the basket lip.
To give you more ideas for using pegboard in the craft room here are some that I found on the internet. They make all kinds of tools for pegboard so the possibilities are endless for organization.
This one is from The Blessed Nest blog

This one is used for stamping tools at iStamp blog.

These next two were found on Craftster.org


Thanks for stopping by. I hope you enjoyed the post.
Bette Shaw
My sewing room is pretty small, only 8 ft. by 10 ft., so I have had to make use of every available space. This outside wall is block so very hard to attach anything to it.
I solved the problem of wasted space by putting a large piece of pegboard in this spot.
I painted it to match my wall paint, attached it to the wood at the top of the wall and then had to decide how best to use the space.
I added a shelf, hooked some covered baskets to the bottom and side and even found a spot for the basket holder that has been sitting on a table in my way for some time.
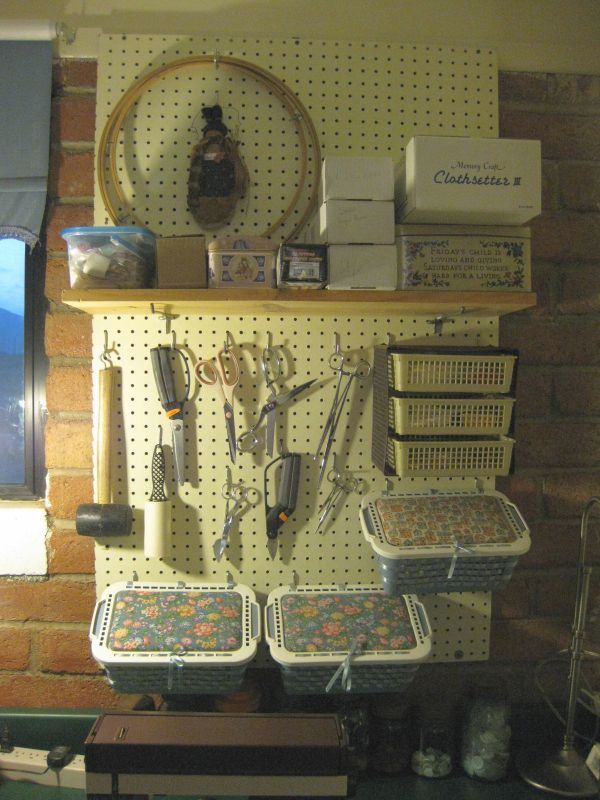
I decorated these baskets a long time ago so I don't know if they are still available but I will show some close up pictures of how they are put together.

For the fabric on the lid, just cut a piece of cardboard the size of the middle of the lid and cover it with batting and fabric and glue it to the lid. The front of the lid has 1/4 inch ribbon glued at the sides and then woven through to the middle and tied in a bow.

Weave 1/2 inch wide ribbon through the basket sides. And the lid is tied to the basket in the back with three pieces of ribbon left a little bit loose so the lid will open and close and tied in a knot. These baskets are just hooked over a couple of peghooks under the basket lip.
To give you more ideas for using pegboard in the craft room here are some that I found on the internet. They make all kinds of tools for pegboard so the possibilities are endless for organization.
This one is from The Blessed Nest blog

This one is used for stamping tools at iStamp blog.

These next two were found on Craftster.org


Thanks for stopping by. I hope you enjoyed the post.
Bette Shaw
Subscribe to:
Posts (Atom)




